Rear Shock Absorber Question

Quist22

Member
Joined
Sep 16, 2021
Messages
34
Reaction score
14
Points
8
Buick Ownership
2004 Park Avenue
Hey Everyone. I recently replaced the rear shock absorbers on my 2004 park avenue. The oem one on the passenger side started leaking oil so I replaced both of them with KYB SR1002. Removal and install went fine with no issues. However, after install the rear end make a thumping sound every time I hit bumps. It sounds very similar to if you were to knock on the spare tire cover in the trunk, so I removed that hoping that's all it was and the sound is still there. I checked the rear end suspension with the car on the ground to see if I could notice anything loose, nothing appeared to be loose. The nut on the top of the shock seems tight when on the ground. I am wondering if anyone has run into this with aftermarket shocks before? I kept the oem shock mounts in there as they looked fine visually, could the shock mount be the issue, maybe I need KYB mounts? The car also "skirts" to the driver side pretty bad if you hit a bump on the highway or going at faster speed, which makes me think the shocks aren't doing there job. They seem to fill with air fine, I hear the compressor run and then shut off time to time. I am also wondering if maybe the shocks are stiff and need breaking in? I haven't replaced a whole lot of shocks before so I don't have a ton to go off of from past experiences so any insight is appreciated. Thank you!
 
I had that same problem with the rear KYB shocks. I ended up replacing them...with another set of the KYB's (same issue), and finally ACDelco (I would use the Monroes if doing them today).

Afterwards, I wondered if increasing the Rear Ride Height would have made a difference.

On the ride height sensor, loosen the adjustment screw and adjust the arm.

I think I was using new KYB mounts, but cannot remember for sure. The experience was disappointing; at the time, KYB had just released these new rear shocks that fit the PA. I very much liked the KYB struts on the front.

I told the shop to just keep those two sets of KYB shocks.
 
Last edited:
thanks for the feed back. Did you have vehicle stability issues with your KYB's as well? that's my main concern, I can live with the thumping sound but the skirting around on the highway makes me nervous. I think I am going to loosen things up and try re tightening to see if that helps at all. do you know where the arm is located by chance? that's a bummer about the KYB's, Ive had good luck with them in the past. it stinks because I was going to go with the Monroes because they were cheaper, but they required the air kit and my history with KYB helped me choose them...
 
When I bounce the car there is some movement between the rubber boot on the shock mount and the zinc plated washer on the shock. Could that maybe mean the mounts are bad or is that normal function of the mount? I’d say maybe moves a 1/16” max ( hard to gauge while bouncing). The nut up top seems tight. The passenger side seems worse than the driver but they both have some movement.
 

Attachments

  • A8A16AF9-1324-4F5B-94B2-4FB03EB5693C.webp
    A8A16AF9-1324-4F5B-94B2-4FB03EB5693C.webp
    257 KB · Views: 14
______________________________

Help support this site so it can continue supporting you!
Not familiar with the KBY rear shocks but I am familiar with the thumping noise my experience is a bad strut mount can you tell if it is one side or the other. I have owned a total of 7 of these cars and my dad has 2 which I work on. Good luck Bill
 
its hard to say, when I bounce the car manually I get no noise, a little bit from the passenger side but its hard to pin point. Driving around today and really focussing on it, it almost seems like a rattle/thump sound where quick bouncing really triggers it. I looked up mounts at Napa and they aren't terribly expensive so I might just replace them and see what happens. Am I able to replace the mounts with the car on the ground? If so, process I am thinking would be loosen the nuts in the trunk, disconnect the air fitting from shock, pull the shock down enough to clear mount, replace mounts, install shock. Would that work, or would this cause any stress on the coil spring? thank you
 
I would think it would be easier to loosen the top nut when the car is on the ground then jack it up to take pressure off of the mount.
 
Thank you for the feed back. I will just Jack it up and do it that way to be safe and support the control arm. I was just wondering if I could short cut the process and try it on the ground since I can get my hand in there above the wheel but wasn’t sure if that would damage the coil spring.

I’ve been reading reviews about the kyb’s and as mentioned above there seems to be some about the clunking. I think before buying new shocks I am going to see what new mounts will do. I am wondering about mounts and if it’s an ok practice to use mounts made by a different manufacturer? So example I have kyb shocks and I buy mounts made by gabriel and use the Gabriel cup washers provided with the mount? I read some reviews on the kyb mounts not being so good and the Gabriel mounts are 10 bucks a piece cheaper at autozone.

Also on a side note. What does the black rubebr cap (Kindof looks like a Mickey Mouse head, I don’t have a picture of it) that goes over the shock stud in the trunk do? I think the kyb shock shaft is a little too long so every time I check the mount in the trunk the black cover is has come off a little bit and I need to push it back down. I am wondering if that could be a sign of anything.

Thank you
 
I took a look again at this and noticed that the top cup washer in the trunk doesn’t contact the rubber fingers on the mount. The videos I have seen on YouTube it seems like people are tightening them to where they distort the fingers slightly. I’m starting to wondering if maybe the shock shaft is too long? Or maybe I’m not tight enough. Does anyone know the torque spec of the top shock nut? Wondering if i should get out there and have someone hold the shock and then really crank on it to see if I can get the cup washer to contact the rubber fingers.
 
I took a look again at this and noticed that the top cup washer in the trunk doesn’t contact the rubber fingers on the mount. The videos I have seen on YouTube it seems like people are tightening them to where they distort the fingers slightly. I’m starting to wondering if maybe the shock shaft is too long? Or maybe I’m not tight enough. Does anyone know the torque spec of the top shock nut? Wondering if i should get out there and have someone hold the shock and then really crank on it to see if I can get the cup washer to contact the rubber fingers.
why would it contact or need to contact the rubber?Snapchat-748811480.webp
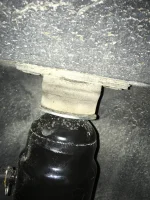
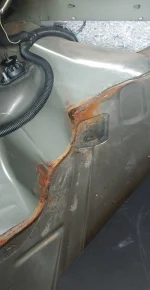
this is close to what it would look like, but I do believe in that photo I had the shock off and thi was mid repair. the reason for shock off was that rust, I was examining the damage in wheel well undder car, etc.

Also, I dont think the issue is so simple guys here is what we know:
your front struts and their condition and what they correlate to for ride quality is SUPER important here. The rear suspension is Very very good at not lifting when the front end dives. spongy front suspension or stilted rear will be very evident because of the cars being heavy and the rear will stay where it is at in a stop, because of the trailering arms and the coil spring. SOmething the car can do is bob back which is usually worse in an accceleration, opposite. That means our front lifts upand your weight is shifted back. this is the moment your rear shocks are necessary to dampen that force transfer, and the mounting needs to be right, the shocks air system needs to be operational, calibrated(scan tool 2000+, C codes and options) 2007cxl has a tech 2 and a lucerne which has the same rear air shock system, in simple meaning. 2000 up you should NOT be playing ith your level sensor. youre car has a ride height calibration which actually is more dynamic than the adjustment because you put the car in its "resting state" of contents, so maybe a little weight in the rear end if you are my car, IF that is always present. dont count temporary, becuase it will sit stilted if you do drive without. You need it set when its empty as far as you hop in, drive it, and get out. THe things you woulld leave in and never touch? Jumper cables, perhaps med kit, maybe sound system. full size spare. ETC. just keep it where it stays and take all the rest out. Calibrate.

Also, there IS a TSB on the subject, it has to do with the OEM shock kits, made by other companies, require 25 pounds and the drier has to be opened and replace the spring to get it to 25 which is more pressure

Also, I read some chatter here about having removed the shocks or put them in at full extension, there is a reason you want to support the control arm and its not because of the shock
504-123-installed-domino.jpg


Do you see the spring? Its off its mounting , either turned or just now trying to pogo outward. compress that suspension and its pushing the control arm toward the ground at a weird, confusing, and ultimately AGGRESSIVE spring rate, because its not operating as intended. rear springs and isolators(2 per)
155724.gif
155714.gif

abec0335297578b4da1bb9351ed8502a.jpg

Gyazo
It looks like I made the mistake of using the wrong cup washer. Perhaps you did too. Can you show us what you see on both sides
 
The cup washer contacting the fingers on the rubber mount was just an observation I made in some of the videos I had watched online which made me wonder. I will try to get some pictures tonight when I can, I believe I used the washers correctly but doesn’t hurt to see what you all think. I am starting to think it’s the passenger side mount. As I have someone bounce the car you can see the shock move independently from the rubber mount. The driver side doesn’t seem to do this. Am I able to post video attachments in here? I could try to get a short video.

My question about the coil spring was more so if I didn’t want to use Jack stands and just leave the car on the ground. I can get my hands in there and I was wondering if I can remove the shock nut up top and pull down on the shock to clear it of the mount. Then replace the mounts and pull the shock back up. It was just an idea to quickly swap the mounts. I have no idea how hard it might be to fight the shock pressure. I understand that the control arm needs to be supported if in the air but wasn’t sure if the shock helped support the load at all when the car is on the ground and wasn’t sure if removing it so it’s only the sprint supporting the car would do any damage.

Thank you for the pictures and detailed posts.
 
______________________________

Help support this site so it can continue supporting you!
The cup washer contacting the fingers on the rubber mount was just an observation I made in some of the videos I had watched online which made me wonder. I will try to get some pictures tonight when I can, I believe I used the washers correctly but doesn’t hurt to see what you all think. I am starting to think it’s the passenger side mount. As I have someone bounce the car you can see the shock move independently from the rubber mount. The driver side doesn’t seem to do this. Am I able to post video attachments in here? I could try to get a short video.

My question about the coil spring was more so if I didn’t want to use Jack stands and just leave the car on the ground. I can get my hands in there and I was wondering if I can remove the shock nut up top and pull down on the shock to clear it of the mount. Then replace the mounts and pull the shock back up. It was just an idea to quickly swap the mounts. I have no idea how hard it might be to fight the shock pressure. I understand that the control arm needs to be supported if in the air but wasn’t sure if the shock helped support the load at all when the car is on the ground and wasn’t sure if removing it so it’s only the sprint supporting the car would do any damage.

Thank you for the pictures and detailed posts.
the thing you mention independent, i think it depends. Basically, how much actual shaft is sticking up past the nut? should be a hex and maybe a lil thread or two.if your shaft is like that, and its popping that cover off , it could be like my driver side one now(same one pictured). If I jack the front of car on passenger or rear sideto put more on the corner, it just kinda stabs through. But if you have it threaded all throuh

Actually, wait. I have a aurora with the factory shocks on. I can go check that and then I can see myself, too. They even work right lol.

pretty sure the idea is, the shaft is connected to the top of the shock, the upper tube, That should remain unchanged. Then there exists a normal hydraulic shock in there either the rest of the way or until the air bag. Then the airbag sits at the bottom, and jacks the car up , lets say its loaded, so that the shock would be resting in the factory height position , but its now compensating for the coil spring to keep it in the appropriate length for its properspring rate, and full squishy squish.

Now the onl thing Im not remembereing for sure is if the top or bottom was airbag, because the port I want to say preferences the top nearer mount... wait... hmm.. Bascally it may just sit at the top of the whole thing and just lift up the top of the tube over the rest but I feel like the first one was right


THEN of course, if you have AC delco, monroe aftermarkets,(gabriel Id think, KYB too, etc) you prob want your PSI at the factory setting for not -factory shocks..... which is 10 psi or so highr than stock. you need to replace a spring on compressor for that. if this applies all around, it would explain shy they have short lives. drive a tire 10psi low and see how long it goes and how well it isolates lo.
 
I finally got around to replacing the mounts over the weekend. Install of the new mounts went well. I was able to do it with the car on the ground, I used a floor Jack to support the car at ride height at the Jack point and then removed the air fitting so the car didn’t drop down. Figured I’d share that in case anyone else was curious about that. I’m thinking i could’ve replaced the shocks like this as well since it’s easy for me to crawl around under the back of the car. I am glad I replaced them because my old ones were starting to crack which i didn’t notice before. However, the noise is still there unfortunately so that didn’t solve it. I am starting to think like others have posted that maybe the shocks are over inflating with air. The more I think about it, the more this seems to be the case. The rattling when going slow over bumps seems to be as if the rear end is stiff and it makes sense to me that if it’s too stiff that would be why the car skirts over bumps when going faster. I am going to have to learn about the compressor some to play with this. I am wondering what the normal sequence of the compressor is when starting the car? The compressor usually always kicks on when I start the car. Runs for a different length depending on how many people are in the car. I haven’t studied too much. I’ve noticed it makes a pop sound and then it begins running. Any tips on what to listen for and when? Thank you
 
For my car, the compressor kicks in when I start the car after it was sitting for a few hours or over night. Typically it runs for about 20 .. 30 seconds. After that it usually repeats after a few minutes for about 10 seconds, then is quiet for the next hours.
I believe that this is the usual behavior. If it kicks in longer or more often, I understand this indicates a leak somewhere, commonly the shocks. In my car, in 25 years, I have not had a leak anywhere else.
 
My '02 Park Avenue does the same. The compressor kicks on for a few minutes and then shuts off. I currently have a rattle noise on the left rear, but I don't believe it is related to the air shocks. There are some other stabilizer links in the rear and I am going to take a closer look. Also, I can feel a difference in the way it rides as it seems to make a noise and move a bit. This was not a gradual change, but seemed to happen all at once, so I am thinking there is something worn out or broken, unrelated to the air shocks.
 
______________________________

Help support this site so it can continue supporting you!
I finally got around to replacing the mounts over the weekend. Install of the new mounts went well. I was able to do it with the car on the ground, I used a floor Jack to support the car at ride height at the Jack point and then removed the air fitting so the car didn’t drop down. Figured I’d share that in case anyone else was curious about that. I’m thinking i could’ve replaced the shocks like this as well since it’s easy for me to crawl around under the back of the car. I am glad I replaced them because my old ones were starting to crack which i didn’t notice before. However, the noise is still there unfortunately so that didn’t solve it. I am starting to think like others have posted that maybe the shocks are over inflating with air. The more I think about it, the more this seems to be the case. The rattling when going slow over bumps seems to be as if the rear end is stiff and it makes sense to me that if it’s too stiff that would be why the car skirts over bumps when going faster. I am going to have to learn about the compressor some to play with this. I am wondering what the normal sequence of the compressor is when starting the car? The compressor usually always kicks on when I start the car. Runs for a different length depending on how many people are in the car. I haven’t studied too much. I’ve noticed it makes a pop sound and then it begins running. Any tips on what to listen for and when? Thank you
If you want to verify something easily with your car, fill the gas tank, unload all things and items from the car, park with proper PSI in all tires on a flat surface like a concrete floor in a garage, move the driver seat all way back, turn the key on, get out and close door, bounce the rear of the car from the trunk center three times to normalize the height, and measure a spot on the same point on both sides like the rear quarter panel on the corner of the wheel well, or use something like the rocker of the rear doors. something that is equal to both sides. measure to the floor straight down(so consistent) and measure both sides. if they vary both sides more than 19mm or 3/4inch, there is an issue with the rear springs or some suspension component and not the level control system.
 

Automatic Level Control (ALC)​

The Automatic Level Control (ALC) system automatically adjusts the rear height of the vehicle in response to changes in vehicle loading.

The ALC system consists of a height sensor, an air compressor assembly, an ALC compressor relay, an intake hose and filter, an air tube, and two rear shock absorbers. The air compressor assembly consists of an air compressor and an air dryer mounted on a bracket. The air compressor head is a replaceable part of the air compressor. The exhaust solenoid is a non-replaceable part of the air compressor head.

The compressor is activated when the ignition is on, and weight is added to the vehicle. The exhaust solenoid is connected directly to the battery (+), enabling the system to exhaust with the ignition off when excess weight is removed.

Raising the Vehicle​

When a load is added to the vehicle, the vehicle body moves down causing the suspension position sensor actuating arm to rotate upward. An arm movement of about 25 mm (1 in) amounts to a height change of approximately 12 mm (0.5 in) at the rear bumper. The upward arm movement activates an internal timing circuit inside the position sensor, and after an initial fixed delay of 17–27 seconds, the sensor provides a ground to complete the compressor relay circuit. The 12 V (+) circuit to the compressor is then complete and the compressor runs, sending pressurized air to the shock absorbers through the air tubes.

As the shock absorbers inflate, the vehicle body moves upward rotating the actuating arm towards its original position. Once the body reaches its original height, +/− 25 mm (+/− 1 in), the position sensor opens the compressor relay circuit, and the compressor is turned off.

Air Compressor Head Relief Sequence​

In order to reduce current draw during air compressor starting, the position sensor performs an air compressor head relief sequence before air compressor operation. This sequence reduces the air pressure in the air compressor cylinder during start-up. The air compressor head relief sequence occurs as follows:

  1. The exhaust solenoid is energized by the position sensor.
  2. The air compressor is activated 1.3 seconds after the exhaust solenoid is energized.
  3. The exhaust solenoid is de-energized 0.5 seconds after the air compressor is activated.

Lowering the Vehicle​

When a load is removed from the rear of the vehicle, the body rises, causing the position sensor actuating arm to rotate downward. This again activates the internal timing circuit. After the initial fixed delay, the sensor provides a ground to complete the exhaust solenoid circuit, energizing the solenoid. Now, air starts exhausting out of the shock absorbers, back through the air dryer and exhaust solenoid valve, and into the atmosphere.

As the vehicle body lowers, the actuating arm rotates to its original position. When the vehicle body reaches its original height, +/− 25 mm (+/− 1 in), the position sensor opens the exhaust solenoid circuit, which closes the exhaust solenoid and prevents air from escaping.

Air Replenishment Cycle​

The position sensor actuating arm position is checked when the ignition is turned on. If the sensor indicates that no height adjustment is needed, an internal timer circuit is activated. After about 35–55 seconds, the compressor is turned on for 3–5 seconds. This ensures that the shocks are filled with the proper residual pressure. If weight is added to or removed from the vehicle during the time delay, the air replenishment cycle is overridden, and the vehicle rises or lowers after the normal delay.

Air Compressor Description​

The air compressor is a positive displacement air pump, powered by a 12 volt DC permanent-magnet motor. The air compressor head contains intake and exhaust ports plus a solenoid-operated exhaust valve that releases air from the ALC system when energized. Air compressor intake air is drawn through an intake air hose and filter, mounted in the right side body rail. The air compressor is a serviceable part and is mounted on a bracket. The bracket is mounted to the underbody, right side, rear of the rear suspension.

Air Dryer Description​

The air dryer is attached to the air compressor head assembly at the pressure outlet and provides a dual function:

  • It contains a moisture-absorbing chemical that absorbs moisture from the compressed air before it is delivered to the rear shocks. Moisture is removed from the air dryer and returned to the atmosphere when air is exhausted out of the shocks during lowering.
  • It contains valving that maintains a system residual pressure of 48–97 kPa (7–14 psi). This system pressure is maintained for improved ride characteristics and improved air sleeve reliability. (THIS IS THE IMPORTANT PART THE TSB FROM GM FOR ADJUSTING THE PRESSURE FOR AFTERMARKET AC DELCO(PRESUMABLY ALL SHOCKS OTHER THAN OEM FACTORY UNITS) IS FOR

Exhaust Solenoid Description

The exhaust solenoid is a non-serviceable part of the air compressor head and provides a dual function:

  • When energized, it exhausts air from the rear shocks.
  • It acts as a relief valve to limit the maximum air pressure output of the compressor.

Air Compressor Relay Description​

The relay, located in the relay center under the rear seat, completes the 12 V (+) circuit to the compressor motor when it is energized. The sensor controls the relay.

Height Sensor Description​

The solid-state sensor detects height changes at the rear of the vehicle and, in turn, controls the functions of the compressor and exhaust solenoid. To prevent energizing the compressor relay or exhaust solenoid during normal ride motions, the sensor circuit provides a fixed delay before ground is completed to either circuit.

In addition, the sensor limits compressor run time and exhaust solenoid energized time to a range of 4.5–7.5 minutes. This prevents continuous compressor operation in case of a severe system leak or continuous exhaust solenoid operation. The timer circuitry is reset whenever the ignition is cycled OFF and ON, or the sensor exhaust or compress output signal changes.

The sensor is mounted to the left front side of the rear suspension support assembly. The actuation arm is attached to the left rear control arm by a short link.

Air Shock Absorber or Strut Description​

The rear air adjustable shock absorbers are constructed with a rubber-like air sleeve attached to the dust tube and reservoir. This sleeve forms a flexible chamber which extends the shock absorber when pressure in the chamber is increased. When air pressure is reduced, the weight of the vehicle collapses the shock absorber. In order to maintain proper operation and reliability of the air adjustable shock absorbers, a system pressure from 48–97 kPa (7–14 psi) (see previous underline/italic/bold portion)must be maintained at all times.

Air Lines and Connectors Description​

The air line is a non-serviceable item consisting of the following:

  • One connector at the ALC air dryer
  • Air lines between the ALC air dryer and the 2 rear shock absorbers
  • Two connectors with spring clips at each rear shock absorber
At the rear shock absorbers, the air line connectors are held on with spring clips which snap into the grooves of the shock absorber air fittings. Air lineconnectors are sealed using 2 O-rings.

Although the lines are flexible, care should be taken not to kink them and to keep them from contacting the exhaust system.


I Just provided the Description and operation for a 2004 buick park avenue ALC (Automatic Level Control) system which I verified to match a 1999 Buick Park Avenue ALC for the operational qualities which, unless I am missing something, should match most gm ALC systems from 1996 ish to 2005 across Pontiac, Buick, Oldsmobile, and Cadillac units. Presumably if any Chevy cars like a monte carlo or impala had the system at all, they likely did too. But I dont know much about the Chevy cars from this time as it relates to ALC. Bonneville, Aurora, Park Avenue, Lesabre, Deville, Eldorado(I think), and 88, 98 are the models, I believe, that would have used this same system. If I am wrong please correct me, but the GM compressor and ride height sensor for the most part was used interchangeably to 1999, then 2000-2005 between models. The 2000+ compressor works on the previous 1999 and older cars(down to 1995 or 1996 when first utilized) it just lacks the tech 2 interfacing and also potentially requires a pinout change on the connector, POSSIBLY. 2000-2005 biggest difference was a revised compressor I believe that was smaller and slightly more reliable and had tech 2 height calibration and stored codes under C____ so as to be easier diagnosed. the 1999 and couple year earlier units were adjusted by manipulating the height sensor and the diagnostics were old school with DVOM and service data.

Being the 1999 Data (for Riviera, Aurora, and Park Avenue) matches the 2004 Park Avenue data, I would suspect the behavior of all cars with the same suspension and sensor/compressor had the same behavior.

If you are using anything but the OEM part number shocks, so even AC delco kit replacements or monroes or etc, I would suspect the GM tsb on increasing the residual pressure is a necessary adjustment for proper shock operation. But beside that point, all the information I provided in the first part should help you understand how it should normally behave.

When I had my old 2001 aurora, which would be like a lesabre and had the same system etc, When I turned the key on, I usually heard the compressor after a short while and it would make a couple noises but it was short lived. I believe that was the behavior described above, but I did not have the car in a "perfect" test state either, with no items in side, seat back, jouncing, etc. So I cant go back in time to test properly, but if that helps understand then good 🙂

When the car is adjusting height, the compressor will be noisier and probably run for more than 5 seconds continuous if it has to adjust. If you suspect leak, you would notice the amount of time of noises after Key on to be longer with the longer the car was unused. Worth a try sometime if you dont end up going anywhere for a while. Colder temperatures theoretically should allow it to leak faster sitting, if the sealing is an issue.


Finally, @Quist22 , if you want a visual way to check, could you jack up your car with your control arm, close to the wheel as possible, then doing the same on the other side after, and pull off tire. The idea is to load the suspension arm just enough to pull the wheel, take a picture or measure your spring on both sides, pictures would be best of course, and show us? if your spring is compressed more to one side under the same weight, the thudding could be a side-to-side imbalance or the shock is having to compensate more to one side causing the components to be slightly unloaded or the mount to be maybe unbound or binding on the opposite. Also if you ever touched your sway bar links, they could be preloaded or something.
 
Thank you buickgirl for the very detailed posts about the compressor. It was very nice to learn the function of these components! I plan to work on this this weekend and will try to take some pictures.

I had another thought and am wondering if anyone has had this occur. I am wondering about the bolts that mount the shock to the control arm. The bolt is clamping the shock to the control arm. If the ID of the hole on the new shock is a little larger than factory could that cause a loose fitment when bolting the shock to control arm? Everything seems tight but maybe when bouncing around, it’s enough to move. I am wondering if I take a caliper and measure the ID of the hole on the control arm and shock and maybe try to find a hex head bolt that has a closer diameter to the hole then use a nyloc instead of the u shaped nut clip (always wondered what the correct name for these is) that gets installed on the shock mount tabs.
if clamping force overrides the side loads possible it should hold but then its at the whims of vibration loosening, corrosion if fastener is not aluminum and steel friendly, and hardness if sourced a replacement was not the right kind. Good question. Basically, those U nuts fail and usually the bolt is ok, but not all the time. it shouldnt enlarge unless it required drilling larger to fix something, the bolts were loose which means not torqued or other failure, or someone used smaller bolts and the clamping force was less than the side loads, and it started to widen it up. if you have one bigger than OE, drill to a standard size that you can go to hardware store and buy the same hardness in a well fitting size that also fits the tubes. the bolt may have to be smaller than hole on control arm, but if it fits the shock and is torqued with a prevailing fastener or threadlock and the bolt is safe from aluminum concerns then you shouldnt have isssue unless you have some bad control arm bushigns and the whole assembly is jerking side to side instead of moving up and down. (which is very much controlled by the spring, shock, and trailing arm)
Those side to sides would prob shimmy the car and also would not be expected work loads when they designed it, so the issue over time I could see loosening if from that, but i would suspect the torque and the wedging the shock does into the low-movement range control arm is enough for even minor force variations on that level 🙂
 
Back
Top