Zaxer
Well-known member
- Joined
- Mar 23, 2019
- Messages
- 381
- Reaction score
- 339
- Points
- 63
- Location
- MKE
- Buick Ownership
- 2018 Regal TourX
It's been over a year since I started looking for a Sportback front bumper in Rioja Red - and I finally landed one for $700 (they don't come up often). It included all the foglight trim, one (of two) front molding pieces, the upper and lower absorbers and the impact bar. The paint has some scratches - but a good workover with the claybar and polisher should clean up most of it. I have put together a how to guide with some pics - I know a video would be better, but both my camera holders (eg my kids) weren't around today, and I had the time. So, pardon the old school forum technique.
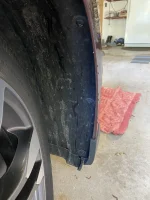
1. Remove (3x) T-15 in each wheel well liner. Note - turn your wheel to opposite lock for best clearance. You do not need to remove the retainer clip in the top center wheel well (directly above the tire) - the liner will flex with enough clearance.

2. Peel the liner back and use a small extension to remove the vertically aligned 10mm aluminum screw In the top corner behind the wheel well liner - directly behind where the metal and plastic bumper meet.

10mm aluminum screw as follows:

3. Once the 10mm screws are removed, you should be able to pull the bumper away from the fender - start at the rear most edge (against the wheel) and pull gently away from the fender. NOTE: there are three total tabs connecting the bumper to the fender - the rear tab is held by the screw, the middle tab should come out easy and the furthest forward tab will likely break. If you want to prevent breakage, you will need to loosen the 10mm nuts that attach the plastic bumper bracket to the fender (you will need an extender). Pic of the bumper bracket as follows:

Damage to the furthest forward tab as follows:

4. Open the hood and locate the (4x) T-20 screws across the fairing and remove. Once these are removed, you should be able to start pulling the bumper off the top - as seen below:

5. Now it's time for the underneath bits - I used the ever popular 13,000 pound limit plastic ramps from Harbor Freight ($45) which work really well - but obviously this step could be optional. If you do elevate the car, don't forget to chock that back wheel (sorry - I'm a Dad and am now required to say these things).

6. Now is a good time to find a sturdy box (10"-14" high) to set dead center in front of the bumper. You will need this to set the bumper on so you can disconnect the harness.
7. Remove the (7x) 7mm screws going across the rear most part of the splash shield. Once you loosen them you will feel the bumper pulling loose. Note there are two outliers (one seen below) and five in an even row across the rear of the splash shield.

8. You can now pull the bumper free and rest it on the box.

...this concludes this part...see next post for next steps...
1. Remove (3x) T-15 in each wheel well liner. Note - turn your wheel to opposite lock for best clearance. You do not need to remove the retainer clip in the top center wheel well (directly above the tire) - the liner will flex with enough clearance.
2. Peel the liner back and use a small extension to remove the vertically aligned 10mm aluminum screw In the top corner behind the wheel well liner - directly behind where the metal and plastic bumper meet.
10mm aluminum screw as follows:
3. Once the 10mm screws are removed, you should be able to pull the bumper away from the fender - start at the rear most edge (against the wheel) and pull gently away from the fender. NOTE: there are three total tabs connecting the bumper to the fender - the rear tab is held by the screw, the middle tab should come out easy and the furthest forward tab will likely break. If you want to prevent breakage, you will need to loosen the 10mm nuts that attach the plastic bumper bracket to the fender (you will need an extender). Pic of the bumper bracket as follows:
Damage to the furthest forward tab as follows:
4. Open the hood and locate the (4x) T-20 screws across the fairing and remove. Once these are removed, you should be able to start pulling the bumper off the top - as seen below:
5. Now it's time for the underneath bits - I used the ever popular 13,000 pound limit plastic ramps from Harbor Freight ($45) which work really well - but obviously this step could be optional. If you do elevate the car, don't forget to chock that back wheel (sorry - I'm a Dad and am now required to say these things).
6. Now is a good time to find a sturdy box (10"-14" high) to set dead center in front of the bumper. You will need this to set the bumper on so you can disconnect the harness.
7. Remove the (7x) 7mm screws going across the rear most part of the splash shield. Once you loosen them you will feel the bumper pulling loose. Note there are two outliers (one seen below) and five in an even row across the rear of the splash shield.
8. You can now pull the bumper free and rest it on the box.
...this concludes this part...see next post for next steps...