joshterhaus
New member
- Joined
- Jul 22, 2025
- Messages
- 2
- Reaction score
- 2
- Points
- 1
- Buick Ownership
- 1999 Buick Century Limited
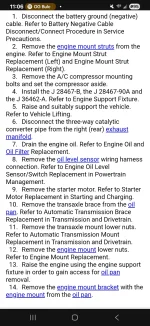
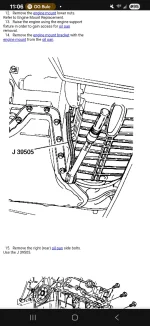
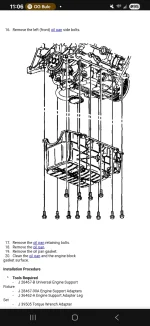
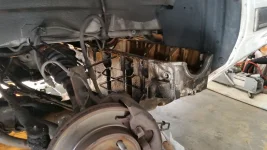
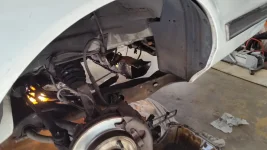
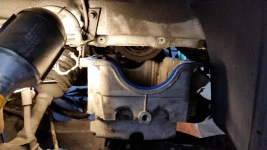
In order to remove an oil pan from 3.1l in a buick century, you have to drop the subframe. Yes, that's right. Even when following factory directions, the pan won't clear the hump in the subframe designed to seat the lower engine mount.
I will post factory directions for removing pan, but follow my instructions as an addition.
After following the factory manual, before removing bolts from oil pan, follow these steps first:
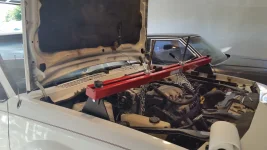
Pre cursor: Make sure engine is suspended at this point, either with a cherry picker or engine bay cross bar, as stated in factory directions.
1. Unbolt and suspend brake calipers on strut assembly springs.
2. Unbolt tie rod ends and remove from knuckles.
3. Unbolt CV axles.
4. Unbolt both lower strut assembly bolts from knuckles.
5. Remove CV axles from knuckles.
6. Unbolt steering rack from subframe, but leave intermediate shaft and p/s lines connected.
7. Suspend steering rack with tie straps, either at the main body of rack, or with both tie rod ends, using straps or bungee cords. Suspend rack so that it does not move at all, as to avoid damage to intermediate shaft.
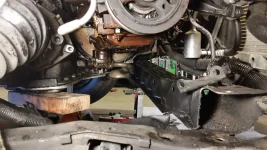
8. Unplug the wire harness at the oil level sensor on oil pan, a/c compressor, oil pressure sensor, and differential connector. This allows slack in the wire harness so you can shimmy the pan out and around it.
9. Unbolt power steering line secure brackets where they connect to subframe. (At this point, your exact trim or year model may have varied brackets or connectors attached to subframe. Triple check around the subframe several times to ensure all connectors and brackets are removed from subframe that cannot follow subframe as it's lowered).
10. Unplug both abs sensor connectors at the end of each control arm.
11. Place any jack that can be actively moved up or down under each of the four corners of the subframe. Raise jacks so that pressure is relieved from the subframe bushings.
12. Slowly unscrew each subframe bolt in sequence, bit by bit, going around in a circle, making sure the subframe comes down evenly and flat. If you unscrew one corner completely at a time, this can cause subframe to tilt and fall of jacks, or components could get caught and damaged.
13. Lower subframe anywhere from 6-12 inches below normal seating height.
14. Proceed to uncrewing oil pan from the block. If pan doesn't clear, continue to lower subframe. If subframe cannot be lowered past a certain point due to jack restrictions, use a floor or pole jack to lift engine slightly in conjunction with lowering subframe. USE CAUTION. If you jack the engine up too much while its suspended on a cherry picker or engine bay cross bar, this can cause engine to move erratically or cross bar may move in unintended ways.
15. *Continue factory directions at this point
I may be missing some steps here, so please provide feedback if you catch anything I missed. If you have your engine suspended in a funky way, pry bars may be needed to work engine mounts out or into subframe during procedure. Check the transmission pan that it doesn't excessively rub the rear of subframe, and actively make sure it doesnt get caught or dented on subframe during lowering/raising.
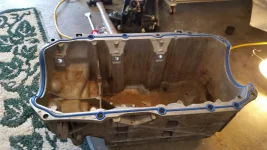
Most of our centuries are high mileage, so before completing this job, it is recommended to order a new oil pump and strainer (sold by Melling on Rock Auto or at parts stores) and replace these while the pan is off. You can also check crank cap bearings for wear, but make sure to tighten back to proper torque specs.
When installing oil pan, use gasket maker, such as FIPG, Hondabond, etc. on the four corners of the pan. This isn't stated in the factory manual, but when cleaning the block you will find that GM used gasket maker at the four corners of the pan. Use this as a reference as to wear to apply gasket maker when installing the oil pan.
I will post factory directions for removing pan, but follow my instructions as an addition.
After following the factory manual, before removing bolts from oil pan, follow these steps first:
Pre cursor: Make sure engine is suspended at this point, either with a cherry picker or engine bay cross bar, as stated in factory directions.
1. Unbolt and suspend brake calipers on strut assembly springs.
2. Unbolt tie rod ends and remove from knuckles.
3. Unbolt CV axles.
4. Unbolt both lower strut assembly bolts from knuckles.
5. Remove CV axles from knuckles.
6. Unbolt steering rack from subframe, but leave intermediate shaft and p/s lines connected.
7. Suspend steering rack with tie straps, either at the main body of rack, or with both tie rod ends, using straps or bungee cords. Suspend rack so that it does not move at all, as to avoid damage to intermediate shaft.
8. Unplug the wire harness at the oil level sensor on oil pan, a/c compressor, oil pressure sensor, and differential connector. This allows slack in the wire harness so you can shimmy the pan out and around it.
9. Unbolt power steering line secure brackets where they connect to subframe. (At this point, your exact trim or year model may have varied brackets or connectors attached to subframe. Triple check around the subframe several times to ensure all connectors and brackets are removed from subframe that cannot follow subframe as it's lowered).
10. Unplug both abs sensor connectors at the end of each control arm.
11. Place any jack that can be actively moved up or down under each of the four corners of the subframe. Raise jacks so that pressure is relieved from the subframe bushings.
12. Slowly unscrew each subframe bolt in sequence, bit by bit, going around in a circle, making sure the subframe comes down evenly and flat. If you unscrew one corner completely at a time, this can cause subframe to tilt and fall of jacks, or components could get caught and damaged.
13. Lower subframe anywhere from 6-12 inches below normal seating height.
14. Proceed to uncrewing oil pan from the block. If pan doesn't clear, continue to lower subframe. If subframe cannot be lowered past a certain point due to jack restrictions, use a floor or pole jack to lift engine slightly in conjunction with lowering subframe. USE CAUTION. If you jack the engine up too much while its suspended on a cherry picker or engine bay cross bar, this can cause engine to move erratically or cross bar may move in unintended ways.
15. *Continue factory directions at this point
I may be missing some steps here, so please provide feedback if you catch anything I missed. If you have your engine suspended in a funky way, pry bars may be needed to work engine mounts out or into subframe during procedure. Check the transmission pan that it doesn't excessively rub the rear of subframe, and actively make sure it doesnt get caught or dented on subframe during lowering/raising.
Most of our centuries are high mileage, so before completing this job, it is recommended to order a new oil pump and strainer (sold by Melling on Rock Auto or at parts stores) and replace these while the pan is off. You can also check crank cap bearings for wear, but make sure to tighten back to proper torque specs.
When installing oil pan, use gasket maker, such as FIPG, Hondabond, etc. on the four corners of the pan. This isn't stated in the factory manual, but when cleaning the block you will find that GM used gasket maker at the four corners of the pan. Use this as a reference as to wear to apply gasket maker when installing the oil pan.