1998 Park Avenue HVAC Mode Actuating Arm orientation question with 4th screw removal tip

5.0MX5

Member
Joined
Jan 27, 2019
Messages
61
Reaction score
26
Points
18
Buick Ownership
1998 Park Avenue, 2001 Park Avenue, 2005 Park Avenue
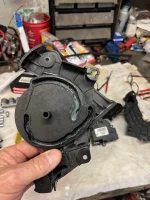
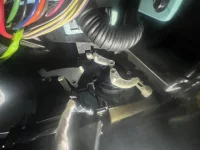
I've removed '98 PA hvac mode actuator assembly. Due to the actuating arm shafts splines being dang near welded to the actuator it was necessary to remove the entire assembly along with the actuator motor. This required removal of the dreaded and much cursed 4th screw at the 1:00 position of the 4 screw fastener set. After many hours spread over a few days I finally stumbled upon a simple, fast way to deal with the 4th screw.

In frustration and since I do have a '01 parts car behind the shop, after many hours I resorted to trying with brute force, to pull and break free the assembly secured by the 4th screw. No luck, the nylon or whatever it is assembly was stronger than my 73 year old self. That process caused the inner two pieces to be bent away from the HVAC housing by a couple of inches and the 4th screw plastic mounting was visible. There was just enough room to slide a set of channel lock pliers up and grab the 4th screw mounting plastic at the furtherest point from the HVAC doghouse housing and squeeze. This caused the plastic tab to snap under the screw head and the thing fell apart. Eazy peazy, just a matter then of pulling it all away from the housing, taking it the vice and using a 1/4" diameter drift to separate the actuator motor from the rest of the assembly.

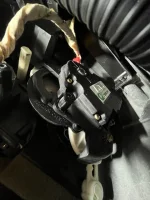
Now in all the above process I did not take a single picture. When I separated the two inner pieces from the housing the 3 actuation arms fell off and onto the floor. No problem I thought, it'll be obvious how they go back. Well, this morning that wasn't the case, a bad 73 year old back, and shoulders make it no fun trying to get these things back in place properly.

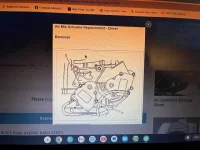
Does anyone have a illustration on how the three white plastic arms go? My two volume factory shop manual set is no help. A few years ago it'd have been easy me thinks, today not so much.

Thanks, Ronnie
 
Just a quick follow up and possibly help for someone down the road. I found a video that was a huge help Here.

Seems a 2000 Cadillac Deville has the same HVAC vent acturator as our 1997-2005 Park Avenues. The attached vid is pretty good, you do need to ignore the portion showing cutting a plastic duct out of the way, we don't need to do that. The actuator arm portion of the video starts at 3.05.

I did have a bad vent control actuator and drivers side blend door actuator. Replaced both, and with help from the video linked above, got the arms back in place properly and all's good. This is a doable job, but you do need to keep repeating this mantra "keep trying, don't give up...keep trying, don't give up". My 3 year old grandson shared this bit of wisdom some time ago. And you can remind yourself that a shop may charge many hundreds of dollars for the repair.

I do have a few images in my phone I'll dig out a and post later.

Good luck if you need to tackle this little project. The results are worth the aggravation.

Ronnie
 
Photos of the HVAC vent actuator arms in place and waiting on the cam to be installed. It’s not a particularly easy job, perseverance is required, but it’s doable. I strongly suggest you take many pictures from various angles at each step of the disassembly process.

Image 1 is a shot looking up from the floor under the steering column, 2 is from the FSM, 3 is the cam that's turned by the mode actuator showing the channels the actuator arms fit into, 4 is the vent mode actuator, 5 is the actuator arms in place ready to receive the cam.

Good Luck,

Ronnie
 

Attachments

  • IMG_4520.webp
    IMG_4520.webp
    18.5 KB · Views: 9
  • IMG_4469.webp
    IMG_4469.webp
    39.1 KB · Views: 10
  • IMG_4460.webp
    IMG_4460.webp
    54.8 KB · Views: 9
  • IMG_4440.webp
    IMG_4440.webp
    36.5 KB · Views: 9
  • IMG_4514.webp
    IMG_4514.webp
    29.6 KB · Views: 9
Just a quick follow up and possibly help for someone down the road. I found a video that was a huge help Here.

Seems a 2000 Cadillac Deville has the same HVAC vent acturator as our 1997-2005 Park Avenues. The attached vid is pretty good, you do need to ignore the portion showing cutting a plastic duct out of the way, we don't need to do that. The actuator arm portion of the video starts at 3.05.

I did have a bad vent control actuator and drivers side blend door actuator. Replaced both, and with help from the video linked above, got the arms back in place properly and all's good. This is a doable job, but you do need to keep repeating this mantra "keep trying, don't give up...keep trying, don't give up". My 3 year old grandson shared this bit of wisdom some time ago. And you can remind yourself that a shop may charge many hundreds of dollars for the repair.

I do have a few images in my phone I'll dig out a and post later.

Good luck if you need to tackle this little project. The results are worth the aggravation.

Ronnie
Do you have things pulled apart still or did you get it all together?
 
______________________________

Help support this site so it can continue supporting you!
Back together (last week) and knock on wood, ac is working great. This is my oldest son's work car and after last years project of replacing the ac compressor, condenser, and dryer along with flushing the evaporator over 50 times (till the flush was totally clean) I was bound and determined to make things work as they should.

Now if the stinking transmission solenoids were working properly it'd be a great little car to drive again.

Ronnie
 
My congratulation to you for getting that air flow fixed. IDN if I have ever mentioned this, but most cars & people with auto climate select a air flow/temp setting & leave it there forever. That is a bad mistake, because the doors seldom move & get sticky which can cause actuator failure. Turn off auto control & move the blend doors from defrost-mid-floor several times. Do the same with temp. Its like a human body, if it never moves, or never exercise the limbs, they will fail & cause pain & failure! I move mine from 90° to 60° along with the air flow direction several times a year to get a full sweep of the actuators & have never had a failure of an actuator.

Start a new thread about what are the problems are with the transmission. We have many threads/post on this subject if you want to do a search.
 
Last edited:
I have an 01 Park Avenue and I am having a hard time finding the actuator for the mode. What part did you use? My original part number is 52473466 and was replaced by 89018383 from my understanding, but that seems to be discontinued everywhere I look, with no aftermarket equivalent. You said the Cadillac Deville was the same, I found Dorman 604-125, is that what you used (or equivalent from a different manufacture)?
 
wstakes, I do apologize for not listing the part numbers used. And unfortunately I've deleted the pictures I made while performing this little job. Best I can do is share THIS. It's a Amazon page with what I believe is the actuator I used. I've got a box of these things, including parts from our 82k mile Park Avenue. I bought the 604-106 actuator in early '24 but wound up using the original part from the parts car (it failed this year). Since I had the 604-106 part and the old, original actuator failed I think that's what I used.

I just noticed the YouTube video showing the Cadillac mode actuator change I thought I'd linked above is gone. Lets try This One.

I wish I could be more help. Good Luck!

RonR
 
______________________________

Help support this site so it can continue supporting you!
From what I can tell, 604-106 is equivalent to 89018365, which replaces 16163982, which is the passenger temperature actuator. I ordered one of those already to replace that actuator. I suppose I can put it in place of the mode actuator and see if it works. If it does, I will just order another one for the passenger actuator. This car sat for a long time (my wife and I just inherited it). I have tried getting the two temperature actuators and the mode actuator to work properly and they are all just stuck in one position. Thank you for the response!
 
OK, To ease my conscious while in the shop this morning I popped the underside dash panel on the drivers side off. Only about a 3 minute job, this allowed me to grab a picture of the mode actuator I installed a couple few weeks ago. The part number is visible. Hope it helps and I do apologize for the misdirection due to my guess on what I used. At 74, if I fail to make notes or take pictures……

Good Luck
Ronnie
 
Ronnie, your thread has already been a great help. I did not expect you to dig into the car again, but I certainly do appreciate it! However, I do not see a picture attached. Unless I am missing something, as I am new to the forum and don't fully understand how everything works haha

Thank you!
 
Well, heck. It seems I can’t post images directly from my iPhone. Knowing that when I made the post above I expected to work it out by now, not the case though.

Numbers on the actuator are; 89018382, next set, 0135220353A, then, 38897282.

As mentioned above I bought this some time ago and it wound up in the spare parts box along with other odds and ends from our ‘01 parts car.

Ronnie
 
______________________________

Help support this site so it can continue supporting you!
That is great! A quick google search while I am here at work, looks like that is the same as what is used on the air inlet actuator for a 2004 PA, but if it's working on your 98, I am hopeful it will work for my 01 as well. I will do some deeper research into those part numbers this evening. Thank you for taking the time to help me!
 
Well, heck. It seems I can’t post images directly from my iPhone. Knowing that when I made the post above I expected to work it out by now, not the case though.

Numbers on the actuator are; 89018382, next set, 0135220353A, then, 38897282.

As mentioned above I bought this some time ago and it wound up in the spare parts box along with other odds and ends from our ‘01 parts car.

Ronnie
To post images, copy them to your PC, then attach or paste them from there into the thread.
 
What you see here is a failure to delete a
Post and an image of the reciently installed mode actuator.

IMG_4918.JPG
 
Last edited:
Back
Top