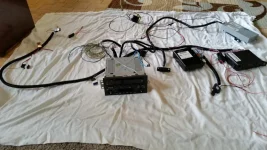
It's hard to me to quantify how much time I have in this setup. I have far more time is studying and figuring out exactly how it works and looking at schematics. The next greatest amount of time was in building the wiring harness to fit my car from the pieces from the 2005 LeSabre Limited.
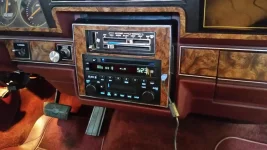
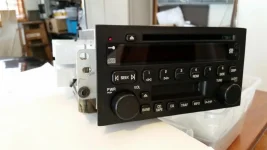
I had a higher end 1.5 DIN from a 90s GM, but it just didn't do it for me. I didn't think it was worth the effort. I decided if I was going to replace the stereo I installed when the car was new, it was going to have to be something special, and double DIN, if at all possible. This actually ended up being more like a 1.9 DIN, as I shaved the top and bottom edges.
In these particular radios (with or without the cassette), the actual off and on is controlled by the Dash Integration Module (DIM). Everything is hot in these radios all the time. The DIM wakes them up, and tells them to go to sleep. You can measure the current drop when they sleep (as they should). The DIM is considered the Power Mode Master (PMM) in this car. The radio will not turn on with power applied when the off/on switch is pressed without the DIM connection over the single wire, class 2 serial bus. I assume this is part of idea behind the silly Theftlock scheme. Removing the internal radio EEPROM, which was common on many of the class 2 radios to bypass the Theftlock, only results in a radio that will not turn on normally and loses presents (the seek >, preset 5, and power will turn it on for 10 minutes, like all of the class 2 series).
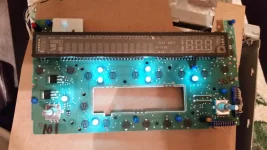
The DIM keeps the time too (as long as powered), while all radio presets are stored in in the radio (non-volitile flash memory).
I had only intended to use the DIM with this setup like older Class 2 units I had read about and researched. The lighting scheme with the
ambient light sensor threw a wrench in that, and I really didn't want to fool with regulating the Vacuum Fluorescent Display power supply via the dash dimming, since the matched module (
VIN) was still available and $10.
The Instrument Panel Integration Module (IPM), sometimes mistakenly called the Body Control Module in aftermarket literature, is programmed with the same
VIN of the radio, other wise, the radio Theftlocks at the first ignition power on (though can be tested in accessory). It is programmed with the GM Tech II
scanner via the OBDII connector, which I included in my installation for possible future needs, even though I have a matched system (which only costs me $50 for radio and both modules). Other than that, the only other function of the IPM in the radio application is to control the dimming of the vacuum fluorescent display. Without the IPM, the display darkens as if the lights are on. The light sensor in the dash of the original car controls the lighting scheme for the entire car. This module does have many of the car body functions in it, but I only included it to keep from implementing my own design to control the brightness of the display internally in the radio. To get away from using the light sensor, I put a 2.2K resistor across the connection of a cheap, Bosch type relay. This makes the IPM tell the radio to brighten the display over the class 2 bus. When the dash lights come on, the relay opens which causes the IPM to darken the display. The normal, button back lighting is controlled by the dash lighting dimmer, though I have replaced all the miserable 3mm bulbs (8 of 14 were burned out in a beautiful car that only had 95K miles). The radio face has 2 voltage regulators that darken 6 of the bulbs (where 5 of the 6 still worked), which I jumpered out to make all the lighting the same brightness.

I replaced all the bulbs with LEDs and left them in parallel (bad idea, Kirchhoff's law), with 660 ohms of resistance in the wiring harness to drop the 12 volts. They look good with even brightness, we'll see if and when they start to fail. I am running them considerably darker than with their intended full voltage because of the 660 ohms of resistance, so I may get quite a bit of life out of them.
Knobs are missing
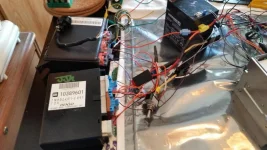
You can see the original light sensor in my messy test set up on top of the IPM in this picture (top left)
The IPM is on the right with the DIM on the left inside the car. You can see my lighting relay behind the DIM.
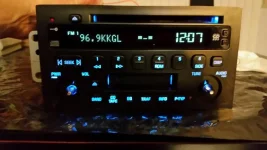
I added the aux input by interrupting the audio input from the XM module (but the XM module had to be detected, or it will not select it, radio is too smart). Allows me to have the aux cable plugged in and still listen to terrestrial radio, the CD or cassette (unlikely).
GM (in their infinite wisdom) put 6x9 8 ohm speakers in the rear of the LeSabre and 4 ohm 6.5" speakers (I checked a few times in disbelief and against other LeSabres) in the doors with separate tweeters (I believe this was classified as a Concert Sound II or III). I'm running 6x9 three way and new CV 4x6 two ways in the front (all 4 ohm as usual). These stereos (and some of the sister division models) have a simple aluminum plate for the amp heat sink. I had noticed the heat sink heated up quite quickly in operation, so I test fit a Socket A processor heat sink to the plate. I was amazed at being able to shoe horn it into the dash like this!

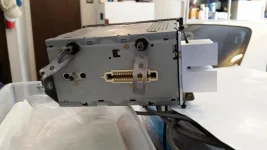
You can see the Dock and Lock system connector on the back. This is the Dock and Lock system which is unique to the 2000 - 2005 Bonneville, Aurora, and LeSabre only. The physical attachment of the radio holds it over the fixed connector mounted in the dash. If I could have found a Century, Regal or Rendezvous (had one of these, 2002, incompatible with XM) with this radio, I could have gotten away from the connector and implemented the keyless entry easier (I added this later too. Radio turns off when door opens now). The module system would have pros and cons compared to how I did this one.
If I had found something I didn't think would have looked terrible in the car, even without cost being an issue, I might have gone a different route. Aftermarket radios just don't look as good to me in old cars as I thought they did when I was young.