Wlepse
SUPER STAR!
- Joined
- Mar 18, 2019
- Messages
- 1,793
- Reaction score
- 884
- Points
- 113
- Location
- NNJ
- Buick Ownership
- 2018 Regal TourX Essence
So in a previous thread I mentioned that my rear brakes had been squealing for a while and I noticed my rear rotor were cooked and pads looked low. That discussion is here. Turns out the pads were fine, but if you view them from the side the step makes it look low.
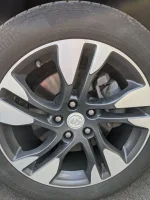
From those discussions it appeared as if the rears on all Regals were the same regardless of being fwd or awd. So even though at the time Powers top did not list a rear kit for the TourX they did for fwd Regals so I took a chance and ordered kit K7717 from Amazon. Today I verified they fit and confirmed they updated their site. Anyway here is what you'll need and some pictures I got along the way.


19mm to get wheels off
T45 or 13mm and arc joint pliers for caliper
18mm ratchet and wrench for carrier
T30 to remove the rotor
Torque wrench set to 110 ft-lbs
So the exchange was pretty straight forward but I do have a few comments. First is on the caliper bolts...I also had to use a pair of arc joint pliers to hold the other side of the slide pin since I didn't have a thin wrench to fit. Not ideal but they weren't super tight so no damage was done. Second, I highly recommend against using a wrench since the connector for the electric parking brake is in the danger zone if you slip, so offset is your friend.

Pads came out easy, hardware was in good condition and slides were fine. I did try to use my HF caliper tool to retract the caliper but none fit well enough so I turned it in by hand. So obviously nothing in this assembly was seized.
Third comment is on the carrier bolts, they were tight and had loctite. The bottom is easy enough to get a ratchet on, the top requires a wrench due to clearance with a control arm. This was tedious but uneventful.
Next up was removing the rotor using the T30. The driver side popped right off, the passenger side needed a few shots from a dead blow but nothing crazy. Replacing the rotor was as easy as replacing the screw. I should also mention these rotors are fully zinc coated so there is no oily film. It appears the coat after drilling and slotting so they should hold up well.
The kit came with grease for hardware and slides which I used. Hardware snapped right in and was well formed. Bolting the carrier back was tedious due to the tops clearance. The pads slide right in and moved easily, though I should mention the pads had strange ears that were not present on OEM pads. This didn't affect fit and I can't see that it will affect anything.

As mentioned I turned the caliper in by hand and it wasn't necessary to go all the way back. Not sure if these pads are a little thinner or if the caliper just has a lot of clearance. Either way they bolted back up without fuss.
Reinstall the wheel, properly torque and you are set. I should note the above mentioned torque setting was what I found at one website, I didn't see it in the manual but 100-110 seems reasonable.

I realize there will be no performance increase but they do look nice! One weird thing I can wrap my head around, the passenger side that had a stuck rotor had significantly less pad left. The rotor being stuck to the hub should not make a difference since everything else was free but it is kind of strange. But if you are getting noise and going to investigate try the passenger side first. Hope this helps someone.

From those discussions it appeared as if the rears on all Regals were the same regardless of being fwd or awd. So even though at the time Powers top did not list a rear kit for the TourX they did for fwd Regals so I took a chance and ordered kit K7717 from Amazon. Today I verified they fit and confirmed they updated their site. Anyway here is what you'll need and some pictures I got along the way.
19mm to get wheels off
T45 or 13mm and arc joint pliers for caliper
18mm ratchet and wrench for carrier
T30 to remove the rotor
Torque wrench set to 110 ft-lbs
So the exchange was pretty straight forward but I do have a few comments. First is on the caliper bolts...I also had to use a pair of arc joint pliers to hold the other side of the slide pin since I didn't have a thin wrench to fit. Not ideal but they weren't super tight so no damage was done. Second, I highly recommend against using a wrench since the connector for the electric parking brake is in the danger zone if you slip, so offset is your friend.
Pads came out easy, hardware was in good condition and slides were fine. I did try to use my HF caliper tool to retract the caliper but none fit well enough so I turned it in by hand. So obviously nothing in this assembly was seized.
Third comment is on the carrier bolts, they were tight and had loctite. The bottom is easy enough to get a ratchet on, the top requires a wrench due to clearance with a control arm. This was tedious but uneventful.
Next up was removing the rotor using the T30. The driver side popped right off, the passenger side needed a few shots from a dead blow but nothing crazy. Replacing the rotor was as easy as replacing the screw. I should also mention these rotors are fully zinc coated so there is no oily film. It appears the coat after drilling and slotting so they should hold up well.
The kit came with grease for hardware and slides which I used. Hardware snapped right in and was well formed. Bolting the carrier back was tedious due to the tops clearance. The pads slide right in and moved easily, though I should mention the pads had strange ears that were not present on OEM pads. This didn't affect fit and I can't see that it will affect anything.
As mentioned I turned the caliper in by hand and it wasn't necessary to go all the way back. Not sure if these pads are a little thinner or if the caliper just has a lot of clearance. Either way they bolted back up without fuss.
Reinstall the wheel, properly torque and you are set. I should note the above mentioned torque setting was what I found at one website, I didn't see it in the manual but 100-110 seems reasonable.
I realize there will be no performance increase but they do look nice! One weird thing I can wrap my head around, the passenger side that had a stuck rotor had significantly less pad left. The rotor being stuck to the hub should not make a difference since everything else was free but it is kind of strange. But if you are getting noise and going to investigate try the passenger side first. Hope this helps someone.