'01 Front Sway Bar End Links Fell Out

ledzilla

Full Member
Joined
Jan 2, 2015
Messages
216
Reaction score
18
Points
18
Buick Ownership
2001 Century Custom
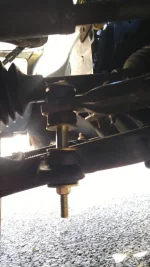
So, last year I had installed a new solid sway bar up front and installed new end links. However, I recently took the car in for a free tire rotation and balancing, and to have the alignment checked, as I was intending to be going on a bit of a road trip. They noticed that there were no end links up front.

Now, I'm no stranger to needing to replace end links, but this is the first time in the nearly 20 years I've been dinking around with cars that I've ever had the end links fall out. Is there some special trick to these end links I'm not aware of to make sure they stay in? Or do I just wrench them down like crazy? I'm thinking when I install the replacements that I'll be adding some lock-tite to the threads.
 
No special trick that i can think of other than with the car up on stands it's easier to put a jack under the control arm\hub to raise the control arm up to the sway bar so that you don't have to fight as much while tightening the nut, or fight with it as much to get the nut started. There should be at least or about an inch of thread sticking out when you're done tightening it, it shoud be tightened until it can't be tightened without turning the bolt head, or it should feel like if you go any tighter something is going to break. You should have the nut all the way to the end of the threads. Also might wanna note, not all garages have honest mechanics, i had a ball joint that was just installed come up with a missing bolt, would swear in the court of law that all of them where as tight as they were supposed to be when installed, but they wanted 160 bucks to replace the missing bolt. It also (maybe coincidentally) was while taking it for an alignment.
 
I guess then perhaps I didn't have them in as tight as I thought. I'll still hit them up with some lock-tite just to be safe. You know, I case I goof it up and don't tighten them properly. Again. Like a fool.
 
I know this is an old thread but hopefully someone will see this. Does anyone have pics of the sway bar end links after it is installed? I need to know the order of the rubber bushings and the plastic sleeve that is on there.
 
______________________________

Help support this site so it can continue supporting you!
Well, for each end link, there should be the long stud or bolt, four washers, four bushings, a spacer sleeve, and a nut or two depending on if there's a long bolt or stud. Each bushing should have a curved side, and the washers should all resemble a bowl or curved dish. The curved side of the bushings should fit into the bowl side of the washers. So, let's assume that you have a long bolt, as I believe that should be far more common anyway. This should be the order of pieces:

1) Start with bolt
2) Add washer so bowl side faces away from head of bolt
3) Add bushing so curved side fits within bowl of washer
4) Sway bar or control arm fits in next, depending on direction of insertion
5) Add bushing so curved side faces away from sway bar/control arm
6) Add washer so bowl fits onto bushing
7) Add spacer
8) Repeat steps 2-6
9) Secure not onto end of bolt

This is the basic order. Unless someone else can get a picture for you beforehand, I'll see if I can get a picture for you later today after I get home since I went to work using one of my other cars. It should help visualize this order. Also keep in mind that during installation of end links, you won't want to put components all the way onto the bolt at the start. Doing so may cause trouble trying to feed the bolt through the sway bar/control arm. Also keep in mind that while your car is up on jacks, you may also need to lift the control arm with your jack. Without end links, the distance between the sway bar and control arm will be too far to be able to secure the nut onto the end of the bolt. That is, unless like previously suggested, you place your stands underneath the control arms.
 
http://www.speedwaymotors.com/62-79...gn=CSEGOOGLE&gclid=CJ_r2Yagp9ACFQsQgQodqQgHVw, I understand what it says it's for but it's the first clear picture that came up. The spacer is probably much shorter otherwise the order is the same. The nut should go above the sway bar with the bolt head underneath the control arm. Order of installation is bolt, washer, bushing, put assembled so far piece through control arm then add bushing, washer, spacer, washer, bushing, then bolt through sway bar and top it off with bushing, washer, nut.
 
Last edited:
I don't really think it makes any difference with which way the bolt head & nut go on top or bottom, as I have seen them installed either way from the factory. Here is a pic of the parts diagram for the 2001 Century:

051215MW06-013.JPG
 
D2500Theory--

If you still need a photo, here you go. This is on the driver side, facing from behind the wheel towards the front.
 

Attachments

  • 1117160938.webp
    1117160938.webp
    47.9 KB · Views: 16
______________________________

Help support this site so it can continue supporting you!
Not trying to argue, just trying to learn, but i don't see how with that much thread sticking out the bottom you don't run the risk of rubbing or poking the tire or rim during aggressive or semi-aggressive driving through turns\curves. Even the illustration shows the thread at the top of the sway bar. Please note it is only out of concern for the safety of the driver that i am asking. Without seeing how close the rim and tire are to the bolt while it's sitting on the ground and the wheel turned towards it, its rather difficult to judge how close the tire actually is.
 
It's plenty far from the tire, so there's no danger of the bolt threads ever coming in contact.
 
It's plenty far from the tire, so there's no danger of the bolt threads ever coming in contact.

Thank you for your reply, the only visual example i have on hand is my PA and the link actually goes into a hole in the control arm which looks closer to the tire than the one on the century, but it does look like if i were to reverse the installation order on it the bolt still wouldn't stick out past the lip on the control arm. Again thanks for the info.
 
Back
Top