94 Regal Rear Caliper Removal

DeanH

Buick Newbie
Joined
Apr 16, 2016
Messages
2
Reaction score
0
Points
0
Buick Ownership
Buick
This is my first post here.

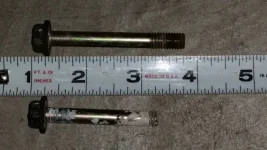
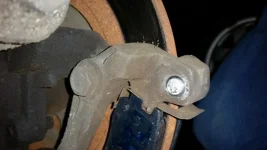
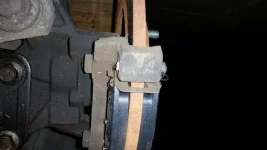
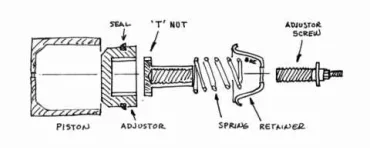
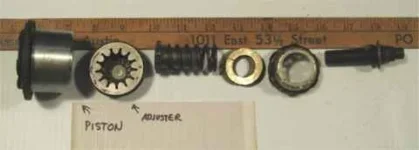
I was replacing the rear brake pads on my 94 Regal Custom. I read the wrong number for torque and twisted off the sleeve bolt in the caliper bracket. It's far enough in that I can't cut a slot in the bolt and back it out, so I'm looking at either replacing the caliper bracket, or taking the caliper bracket off so I can get a straight shot with a bolt extractor.

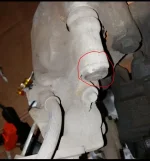
My model Regal has the pivot pin on top instead of two bolts to remove the caliper. There's a cap of some type on the top pivot pin, and I can't find instructions for removing that cap so I can remove the caliper and then remove the caliper bracket.

Does anyone have instructions, images, or anything for help with this?

Thanks.
 

Attachments

  • 20160415_213248_sm.webp
    20160415_213248_sm.webp
    43.7 KB · Views: 16
  • 20160415_213421_sm.webp
    20160415_213421_sm.webp
    25.9 KB · Views: 16
  • 20160415_213444_sm.webp
    20160415_213444_sm.webp
    24.5 KB · Views: 14
  • Bolt.webp
    Bolt.webp
    31.5 KB · Views: 13
I'd still like to know how to remove the caliper, but I was finally able to get the bolt stub out of the bracket.

Thanks for those who do take the time to look at these posts and provide guidance for those of us with less experience.
 
To remove it should be remove the bolt, and pivot the caliper out of the way, you can also slide the caliper off the bracket with it pivoted out of the way of the pads. you may have to try and get the piston to retract a little to release the grip the caliper has on the pad and rotors to pivot the caliper. The easiest way i've found is to grab the rear center of the caliper and pull it straight towards you while standing (kneeling, squatting) in front of the wheel. It only needs to budge a little to relieve the pressure. You'll have to seat the piston the rest of the way to get it on with new pads, C-clamp works good, they also make a tools specifically for the task. Just remember you don't want to seat it tightly or the piston can get stuck. As soon as you meet resistance it's seated, Also might wanna take the master cylinder cap off, and make sure the brake fluid doesn't pour out the top while your seating the piston. Also after you put on the new pads, before you start it, pump the brake pedal until the pedal is back to the top. I've forgotten this step and still haven't finished hearing about the neighbors fence, and that was 15 years ago.
 
Correct me if I am wrong, but IIRC the '94 had the ratchet piston mechanism on the rear calipers, which require a special tool to compress & turn the caliper counter-clock-wise on the piston to contract?? Some may use other tools, but the correct tool for this procedure is not that expensive.
 
______________________________

Help support this site so it can continue supporting you!
Without having the car to look at, (so going by a chiltons repair manual) it says to use a c-clamp to seat the piston. Only thing is, it covers a span of years so if it's referring to a 92 in the picture, they could've changed it for 94, so, not positive whether or not it does.
 
I don't recall when GM changed the design of the rear calipers.....but being familiar with up thru 1991 Reattas (1993 Riviara still used that design) you can remove the nut that holds the parking brake arm...now with the C -clamp and a socket you can compress the piston...as you tighten the C-clamp turn the hex on the parking brake stud and it will screw into the piston.
Also on the broken stud...you could remove the two bolts that hold the cast part to the rear axel and it will come off the car, now you can tackle the broken stud on your bench...drill it out etc.
Here is an exploded view of the Reatta piston and parking brake parts.
 

Attachments

  • Piston explode.webp
    Piston explode.webp
    11.2 KB · Views: 9
  • rear piston.webp
    rear piston.webp
    8.4 KB · Views: 10
Back
Top