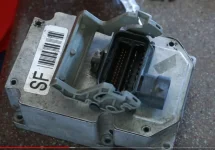
Finally!!!!!!!! Fixed my TRACTION-BRAKE-ABS lights always ON.

JGBuick

Sustaining Member
Joined
Jun 8, 2020
Messages
930
Reaction score
521
Points
93
Buick Ownership
2001 LeSabre Touring Edition
Well... can't tell you satisfying it is to repair something that I've been looking at for quite some time! (And no..it was not a wheel bearing ABS wire etc.)

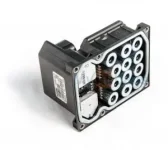
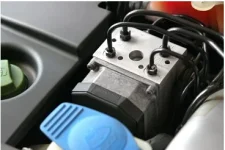
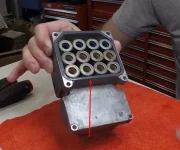
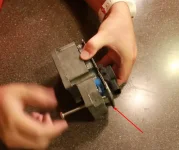
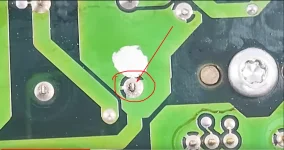
It was an incredibly small solder joint that wasn't fully soldered. UGH! Barely could see it... but it worked!!! Hardest part was getting the ABS module apart.

Followed this Youtube video:
1664137699573.webp
 
Well done JG! You have patience and persistence.
Another Day.jpg
I had the exact problem inside my trunk release motor solenoid: broken solder joints. It drove me around the bend for years ... sometimes worked, sometimes didn't.
What code-reader did you buy?
 
Last edited:
T
Well done JG! You have patience and persistence.
View attachment 39539
I had the exact problem inside my trunk release motor solenoid: broken solder joints. It drove me around the bend for years ... sometimes worked, sometimes didn't.
Thank you John! Man-O-Man.... What's with these parts!? I'll bet that problem drove you nuts! I am astonished something so "little" could cause this.

Pains me to think I was chasing down broken wiring or a bad ABS sensor in the hub. The Breakthrough happened when I finally purchased a decent code-reader. It gave me the codes and I looked them up. From there, and searching around... well...

I cannot tell you good it feels to NOT see those three lights glowing at me all the time!! It's cathartic!

Wow... Hopefully this helps someone else with the problem.

1664150470392.webp
 
Did you have to get a new seal for the module to mate to the bosch unit or does it use an RTV?
 
Did you have to get a new seal for the module to mate to the bosch unit or does it use an RTV?
Sort of.... The actual "box" that houses the circuit board is a separate piece that is attached to the main unit with six screws.
(From up top, this was sort of a pain because I had to use a really small mini-wrench and Torx bit to get at those screws.)

The "box" has a very small rubber seal that mates to the other one. I just lubed it with a tiny bit sly-glyde when reassembling.
(To make sure it wouldn't stick to the mating surface.)

1664205555726.webp 1664205659235.webp

As for the cover secured by RTV... That was a real PITA to open... Lot's of chisels to wedge between the two mating surfaces.
Once I was able to get one side started... It lost it's grip and I could remove the cover.

And yes.... to answer your question, I DID have to apply RTV again when assembling the cover.

I wish I had taken more pictures but was so focused, I forgot!
 
Sort of.... The actual "box" that houses the circuit board is a separate piece that is attached to the main unit with six screws.
(From up top, this was sort of a pain because I had to use a really small mini-wrench and Torx bit to get at those screws.)

The "box" has a very small rubber seal that mates to the other one. I just lubed it with a tiny bit sly-glyde when reassembling.
(To make sure it wouldn't stick to the mating surface.)

View attachment 39550 View attachment 39551

As for the cover secured by RTV... That was a real PITA to open... Lot's of chisels to wedge between the two mating surfaces.
Once I was able to get one side started... It lost it's grip and I could remove the cover.

And yes.... to answer your question, I DID have to apply RTV again when assembling the cover.

I wish I had taken more pictures but was so focused, I forgot!
what kind of RTV did you use? youre okay I was just curious how it went, the service data talked about the seal which you lubed and i had the impression it was an o ring type. if it was in good shape you did great
 
I used regular Black RTV. I had an extra tube left over from when I did my intake repair. The gasket isn't an O-ring. I's more of a flat V-shape and because I'm anal about things, I just touched-up a bit of lubricant on the surface so that when it's compressed, it's going to form a good seal.
(Not that I expect to be attempting this again!!)

Here's a link and a picture from a similar unit on a Corvette:

1664212941612.webp
 
______________________________

Help support this site so it can continue supporting you!
Actually.... This is also a great video as the ECBM is just like the Buick's:

He used a different method to remove the cover. (This may be much easier than the steps I took!!)

1664213151661.webp
1664213253158.webp
 
That was great workmanship ... but please tell me the code reader you bought that had body and brake codes (and maybe AC codes)?
 
That was great workmanship ... but please tell me the code reader you bought that had body and brake codes (and maybe AC codes)?
AC codes are under B for body.
brake are under C for Chassis
then U codes (Which he would have too) are communication codes , B codes are the most "exclusive" among tools it seems, followed by U, followed by C, then followed by P
 
______________________________

Help support this site so it can continue supporting you!
how did you decide to open this module to look in there? There was nothing else it could be? testing and eliminating the other components?
 
how did you decide to open this module to look in there? There was nothing else it could be? testing and eliminating the other components?
Well... I ORIGINALLY thought.... it was the usual suspects - ABS sensor, Wheel bearing, broken wiring harness, loose connections,....

All of that. When I purchased this code reader, I figured it was what I wanted to know. WHERE was the problem???

Well... not any of the aforementioned... The code reader told me it was the ECBM module. I researched and found that tiny little hairpin solder joint -
(I should say: BADLY soldered!) has caused many a problem. I figured I'd give it a try...

Yup!! I could see it plain-as-day... No connection. Terrible board soldering. That's all she wrote!
 
Thanks for posting this. 99% sure that's my problem too. Going to purchase a code reader first...lights turn on an off....kinda like an intermittently bad solder joint connection.
 
Thanks for posting this. 99% sure that's my problem too. Going to purchase a code reader first...lights turn on an off....kinda like an intermittently bad solder joint connection.
There's a lot that happens with bad solder joints... But your lights are probably a different issue altogether. Hope yours is an easy fix.
 
______________________________

Help support this site so it can continue supporting you!
I watch a bunch of YouTube stuff... This guy (Oil Filter review channel) recommended this unit and he actually shows it reading a code (ABS) on his vehicle.

That's the only reason I purchased it! But it worked for me!


Did you have to bleed your ABS after the repair?
This scanner allows ABS auto bleed through the OBD2
https://www.amazon.com/gp/product/B07CSMJJK9/ref=ox_sc_act_title_1?smid=A2YWURTSRUAKKQ&psc=1

Does the Buick LeSabre have the auto bleed through the OBD2?
 
Did you have to bleed your ABS after the repair?
This scanner allows ABS auto bleed through the OBD2
https://www.amazon.com/gp/product/B07CSMJJK9/ref=ox_sc_act_title_1?smid=A2YWURTSRUAKKQ&psc=1

Does the Buick LeSabre have the auto bleed through the OBD2?
the ABS bleed is for actuating the module after youre bled between the abs and master AND the abs and the wheels. The actuation gets air out of the units circuits which are closed during normal operation (ABS and stabilitrak and traction control not intervening)

so yes you have an auuto bleed procedure, its done after doing a manual bleed and it does 1 wheel at a time

Is that a good OBD2 scanner to have?
 
Is that a good OBD2 scanner to have?
no idea but i would bet it does a majority of functions based on what i can see in the video preview , but it depends on what you are trying to do
 
Back
Top