realjohnkramer
New member
- Joined
- Nov 24, 2022
- Messages
- 11
- Reaction score
- 1
- Points
- 3
- Buick Ownership
- 2004 Buick LeSabre Custom best-seller's package
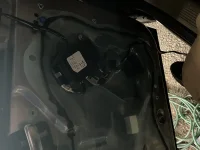
Hello, I have recently installed upgrade speakers in my 2004 Buick Lesabre and initially neglected installing the crossovers. This caused a popping sound in the door tweeters at medium to high volume. Upon attempting to double back and install them, I encountered a roadblock. I do not know which is the input wire(s) for the left hand door module that I would wire into the crossover. Secondly, I don’t really know how to approach the issue of wiring in the crossovers entirely. My first thought was to bypass the module entirely once I figured out which wires were for the input end of the crossover. A wiring diagram for the the module would be perfect. I have attached an image of the module below.