Wiring diagrams, vacuum schematics, and such

EGrimes3

New member
Joined
Feb 5, 2023
Messages
6
Reaction score
2
Points
3
Buick Ownership
1995 Buick Lasabre Custom
I have been searching around here on the forum but have not found any. I was reading in one post about vacuum related problems and if I recall it mentioned there are schematics and diagrams on the forum but I have not found them as of yet. Did I maybe misunderstand that and there are none on here? The vehicle I am dealing with is a 95 LeSabre. The problem at the moment is just driving down the road at any given moment I may lose the air coming out of the I/P vents and will usually return at some given time. Maybe be best to get the factory shop manuals for what I am looking for? I know from the other shop manuals I have they have all this info I am trying to find. I have the vacuum diagram located under the hood with the one that shows to accessory. I was hoping to find the one that shows how it is configured and controlled under the dash where the source from under the hood connects to it.
 
These may help somewhat
930427GM09-011.webp9706204M09-015.webp9206184M09-014.webp9704174M09-017.webp
 
Sounds like you have a vacuum problem from the engine to the reservoir, or line to the inside. It could also be the programmer vacuum restriction mentioned in the link below. When this change of vent air direction takes place, is the car accelerating like up a hill & then corrects itself under lower acceleration going down the incline. I wish the diagrams shown above had some sort of description as to the item numbers, so you would be able to identify what they are. 🙄

How To Correct Mis-directed Cool Airflow in 1996 GM C & H Cars
 
I had a 1997 Olds 88 that was acting as you described. While chasing down a P0171 code ( lean condition ) I was looking under the hood with the engine running and heard a “hissing” sound. It turned out to be at the firewall on the passenger side. There is a conduit that holds wires and a vacuum hose that go to the HVAC system. When I touched the vacuum hose near the check valve it crumbled in my fingers. I replaced the short piece of vacuum tubing and solved 2 problems at once.
With an old car it is always advisable to keep at least a couple of feet of vacuum tubing on hand.
 
Last edited:
______________________________

Help support this site so it can continue supporting you!
Do you have a dual temp control system?
Are you in a hot climate where the plastic chunk in the coupler at the programmer box
softens with age and when it's hot lets the plastic suck closed on the line to the diaphragm
motor for the defroster/dash vents door?

Note the diagram posted in this thread has both the dual system with programmer
and has the single function system with the 4-in-a-line coupler for the lines inside.


And like Z28 says does it occur when the engine is under some load, engine running at
lower speed, and throttle plates open more, which drops the vacuum in the manifold?
How many miles on the engine and how worn is it: is the vacuum on the engine already
low?

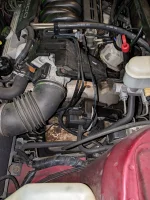
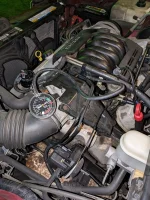
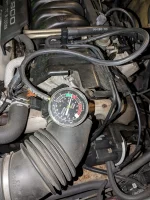
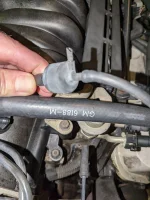
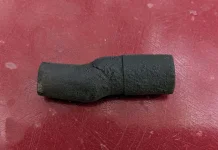
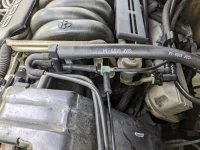
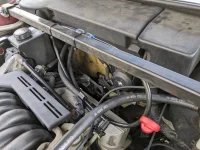
The line under the hood at the engine next to the power brake booster is rubber.
That goes to a connector at the passenger side where there is a rubber segment again.
There is a T-valve inline there which lets "vacuum from the motor go to the line" that
goes into the car AND prevents that part of the vacuum system from leaking down
when the engine end of the T-valve drops, due to acceleration. Check the valve for
one-way passing of air. There are rubber parts of the line (at least on my 98 leSabre
they were rubber) and inbetween are a nylon tubing IIRC. You may have to take off the
cover on the right side of the dash that covers the relay center and some of the wiring and
tubing on the passenger side to see all this.


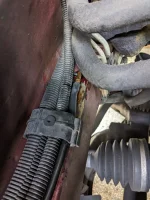
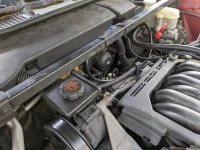
You also should check the vacuum cannister which is under the front fender behind
the headlights. In front of the wheel splash shield. Cracks? If the engine has been
running and just shut off and you remove the line there does the air rush in because
there's a good vacuum on that side of the one-way valve maybe 15-30 seconds
after the engine has been shut off.

If that's okay and the rubber parts aren't cracked, then start thinking about the inside.

Good luck.
Might want to read through this old thread on the problem.

And there were many others on buickforums.com along with pontiacbonnevilleclub.com
forums since the cars were just a few years old.
 
Last edited:
#4 GM Part 25553225 TANK,HTR & A/C CONT VAC, along with the additional hoses.
930920GM03-031.webp
 
I may have the wrong vacuum setup underhood for the 1995 leSabre. I assumed it
was like the 1998. I got a 1995 programmer that worked in my 1998 from the
junkyard, but the rest of the vacuum may use that reservoir on the firewall
from the 92-XX setup.

The diagram given doesn't show a vacuum line for the inside HVAC. The lines
are for the cruise control including the inside brake pedal safety cancel switch.
 
Read this older post
 
______________________________

Help support this site so it can continue supporting you!
No duel climate control, yes I am in a pretty hot and humid area no doubt, car has 148,000 miles on it and as mentioned I have replaced some of the vacuum lines where they come off the manifold due to being cracked and dry rotted and thought for sure that was probably the cause. It does seem to do it more so under acceleration but not always it is kind of random but if it keeps doing it I will inevitability start paying more attention to when and what conditions it seems to do it most.

I have not put a vacuum gauge on the source as of yet but I will do that. I did put a hand vacuum pump on the line leading into the dash from the engine compartment and was able to get it to about 10in Hg and that did not seem to even want to hold as it bleed down which I would not have thought would happen if things are sealed tight. I have not found the vacuum canister unless we are talking about the evap canister which is just behind the left headlight down in the finder well in which one of the vacuum lines does run to that from the source.

The last diagram shown from 2007LucerneCXL does seem to look a lot like what I have under the hood. As for the diagram under the dash of the vacuum and what goes where looks like I will need the factory shop manual to follow that as I was looking to do. At least in my other shop manuals for other vehicles it breaks all that down and shows where every line goes along with color what it does with an explanation of how it all works. Still need to read though some of the other links posted above.

So this link How To Correct Mis-directed Cool Airflow in 1996 GM C & H Cars posted above would apply to mine being a 95? I know it says 96 but I not familiar enough to know when and what changed with the systems to know whey they may or may not be the same application. I know the cruise control use vacuum also but it seems to be working normal at least at this time when I do use it.

Thanks for all the comments, links, diagrams, thoughts, and suggestions dealing with this. I know its probably a simple fix if I could just pin point the exact area or problem but sometimes that can be a tuff thing to do as so many different things could cause the issue.
 
I have now read through all the above links and watched the video. So as I think I now understand the vacuum line from the source which I thought went through the firewall there by the brake booster actually is where it connects to the vacuum canister. From the links above I then understand there is another line that leaves the canister and goes over to the passenger side where it then enters the firewall and connects with the purple tube which in return connects to the controller. That's where the full layout of the diagrams with colors and what things are and a description of the operating would be so valuable. I am a electrician/instrumentation tech and can follow schematics and diagrams very well and understand system easily when things are laid out and marked what they are and such. Thought that small vacuum line went straight into the dash to the controller but makes more sense now knowing that is the vacuum reservoir since I did not see one anywhere else like on my other vehicles where they really stand out as to what they are. Anyway figuring it out a piece at a time makes it all makes sense in the end.
 
This was off a troubleshooting manual, not sure if it is accurate but may be something useful.
c3763964-3462-4cbc-9303-88be4f8effa0acgc13000220000x.gif
 
Yes the above information is exactly the type of info I am referring to that shows colors and descriptions of what and how it works.

A little more info on what I have found and maybe the problem. I will include some pictures for reference.

First off is the three way check valve available I have not researched it as of yet to see? I need that looks like even if not the problem. At first I put my vacuum gauge behind the check valve and was reading 16 to 16.5 but noticed I could move the valve around and it would drop and go back up some. I then noticed the line that comes off going to the cruise control was very loose so that in itself is a problem that needs correcting. I then removed that whole assembly and connected straight on the vacuum tree and now reading a good 18in Hg. As you can see in the pictures the nipple where the line for the cruise connects is broken back some and is a very loose fit when the line is plugged onto that nipple. I did look closer at the vacuum canister on the firewall and also see the other or second hard plastic line coming off or it.

Looks like with a really quick search this may be the replacement for the check valve.
 

Attachments

  • PXL_20230313_022115443.webp
    PXL_20230313_022115443.webp
    299.4 KB · Views: 6
  • PXL_20230313_021800076.webp
    PXL_20230313_021800076.webp
    322.7 KB · Views: 5
  • PXL_20230313_021659935.webp
    PXL_20230313_021659935.webp
    282 KB · Views: 3
  • PXL_20230313_021627928.webp
    PXL_20230313_021627928.webp
    159.6 KB · Views: 4
  • PXL_20230313_021424653.webp
    PXL_20230313_021424653.webp
    305.4 KB · Views: 3
  • PXL_20230313_021344403.webp
    PXL_20230313_021344403.webp
    188.1 KB · Views: 6
  • valve.webp
    valve.webp
    26.2 KB · Views: 7
Last edited:
______________________________

Help support this site so it can continue supporting you!
On my 95 Lesabre I purchased bulk vacuum lines and replaced all of them years ago as they were all in various stages of aging. Because of the amount used for various functions on these era Lesabre's it saved time on guessing on which one went out and I was able to check on the connection they went to was in good shape.

It's a PITA but something to consider as a project based on the age of the vehicle and is a preventive maintenance step.
 
Now that I realized I probably gave the wrong vacuum circuit for a 1995, I'll see what I can find in my 93 leSabre
Factory Service Manual93lesabre1.jpg
snip2.JPG
snip3.JPG
snip1.JPG
 
Last edited:
This was off a troubleshooting manual, not sure if it is accurate but may be something useful.
View attachment 42186


I just used a piece of vinyl tubing and connected directly to the incoming vacuum line to the programmer (pink which had a connector to the black line through the firewall) and then connected directly onto each of the vacuum diaphragms to be sure they weren't leaking from a torn rubber diaphragm and keeping that motor from acting properly.
 
Last edited:
imidazol97 thanks for the breakdowns those are the ones I was thinking of in the shop manual like I have in my other vehicle shop manuals. Just makes it so easy to follow and diagnose when you can see and understand where everything goes and how it should work.

Well I did replace the vacuum check valve as the one that was loose was broken off inside the rubber connector that feed down to the cruise control. It is now a nice tight fit when connected.

Also found that the 8mm nylon line on the passenger side inner fender that transitions to a looks to be 6mm steel line was disconnected. Best I can tell that is the nylon line leaving the evap canister on drivers side runs down under radiator back up beside battery and back toward firewall down low on metal unibody it connects up with a what appears to be two different size rubber connector. Mine of course was short for some reason and would not even reach the steel line any longer. The metal line was rusted and plugged in the end from what I could see. The rubber adapter was split so for the time being I have cleaned it up and used a short piece of 7/32" vacuum tubing the connect the two back together for now. I will include some pictures of what I am trying to describe. Have not searched for the rubber connector to check for availability as of yet.

So from here I will continue to drive it and monitor if my original problem still exist or is now gone and go from there in my search for the problem.
 

Attachments

  • PXL_20230313_204850327~2.webp
    PXL_20230313_204850327~2.webp
    213.5 KB · Views: 5
  • PXL_20230313_205256820.webp
    PXL_20230313_205256820.webp
    199.5 KB · Views: 5
  • PXL_20230313_205329339.webp
    PXL_20230313_205329339.webp
    222.6 KB · Views: 5
______________________________

Help support this site so it can continue supporting you!
I should mention to be mindful of the plastic fuel lines in the engine bay and hopefully they have been replaced if not they need to be on the short list
 
I should mention to be mindful of the plastic fuel lines in the engine bay and hopefully they have been replaced if not they need to be on the short list
Yes been there dealing with that issue also. It was a pin hole spraying fuel out. Wonder why they decided to go with nylon/plastic lines so much. I guess cheaper no doubt. Mine was so close that I decided to make me a loop instead of cutting it really short and having no room to work with. I used the push connectors instead of the heating it and trying to use the barb connectors that the kit came with.

The other issue I have looked into is the oil that seems to be leaking from the valve covers. I have not pulled them off yet but did try and snug them up some at least the ones I could get to anyway. Seems to have helped at least some for now.
 

Attachments

  • PXL_20230313_205452104.webp
    PXL_20230313_205452104.webp
    234.3 KB · Views: 5
  • PXL_20230313_205508879.webp
    PXL_20230313_205508879.webp
    251.5 KB · Views: 5
Unfortunately it's age more than mileage that will be the battle and parts are becoming increasingly somewhat of a challenge new or used. Just suspect everything needs replacement if it's hasn't been done lol, have had my 95 for 23 years and most parts have just aged out over time and Midwest winter salting. Best of luck on getting squared away.
 
Back
Top