• This section is for help and assistance with 2018 and NEWER Buick Regals. If you need assistance with a 2011-2017 Buick Regal, CLICK HERE. If you need assistance with a 2010 or older Buick Regal, CLICK HERE. This notice may be dismissed by clicking the X in the right corner.
  • Car enthusiast? Join us on Cars Connected! iOS | Android | Desktop

Focus: Audio Upgrade Wagon

Just a bit more boom, boom.😉
I can’t wait! It will be the most elaborate build I’ve ever done. Adding two additional subs will only cost me $250, so it was an easy choice.

I’ll end up with a non-standard ohm load, like either 1.3, 2.7, or 6 ohms depending on how I wire them.
 
Last edited:
Anyone know where I can get the sound deadening done professionally in Michigan? I have no experience taking door panels off and I sweat buckets replacing just the driver-side visor which required I pull down the roof liner a bit to unplug/replug a wire...
 
Anyone know where I can get the sound deadening done professionally in Michigan? I have no experience taking door panels off and I sweat buckets replacing just the driver-side visor which required I pull down the roof liner a bit to unplug/replug a wire...
Pulling the door panels off is easy. There are a few videos on YouTube. Getting them back on is the problem.


I’m in the process of making custom sound blocking liners for the doors and I was planning to offer the templates to forum members for a small fee. I’m not looking to make money. I just wanna cover my materials and shipping costs.

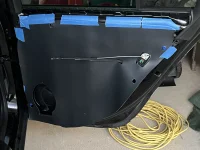
I’ve attached a pic of the rear door liner I’m working on. That is 1/16” Mass Loaded Vinyl and I plan to attach Neoprene to the back. The blue tape is temporary and will be replaced with Velcro.

I started a thread in July to document my entire sound proofing project, but I haven’t uploaded anything yet. I’ll try to do that this weekend. So far, I’ve done the rear wheel wells, part of the hatch, and now I’m working on the doors.
 

Attachments

  • 16876DFD-8808-4D34-852F-17AD979DEC5D.webp
    16876DFD-8808-4D34-852F-17AD979DEC5D.webp
    153.9 KB · Views: 25
Pulling the door panels off is easy. There are a few videos on YouTube. Getting them back on is the problem.
....
Right. thats what I'm afraid of. Those plastic fasteners (and clips) are just so finicky. I'm also worried about the plastics/fabric getting stretched/torn/warped and not looking the same.

How many hours do you think it would take for a professional (or someone experienced with the Regal recently) to do the job (4 doors and the hatch)? I notice your location is listed as Baton Rouge... Just a little too far to drive over and ask for help. 🙂
 
______________________________

Help support this site so it can continue supporting you!
Right. thats what I'm afraid of. Those plastic fasteners (and clips) are just so finicky. I'm also worried about the plastics/fabric getting stretched/torn/warped and not looking the same.

How many hours do you think it would take for a professional (or someone experienced with the Regal recently) to do the job (4 doors and the hatch)? I notice your location is listed as Baton Rouge... Just a little too far to drive over and ask for help. 🙂
I’d say 6-8 hours for a professional. That’s assuming they have to start from scratch. They may have templates from similar cars that can be modified and save some time. It also depends on the level of detail you want. At a minimum you want a CLD inside the door shell and you want to seal the holes. Keep the OEM plastic and polyester liners.

If you can afford it, I’d also apply CLD on the outside of the door shell and CCF inside the door panel. Finish it off with a layer of MLV and you should be able to reduce the overall noise level by 8-10 dB. You’ll also have a big improvement in the quality of your sound system.

I don’t have a clue about the cost. My best guess is $600-$750.
 
I’d say 6-8 hours for a professional. ........cut.....

I don’t have a clue about the cost. My best guess is $600-$750.

For 8-10db lower noise, I'll easily shell out more than that! I'd travel for it, but leaving the car with someone for a whole day away from home is difficult logistically...)
 
I’d say 6-8 hours for a professional. That’s assuming they have to start from scratch. They may have templates from similar cars that can be modified and save some time. It also depends on the level of detail you want. At a minimum you want a CLD inside the door shell and you want to seal the holes. Keep the OEM plastic and polyester liners.

If you can afford it, I’d also apply CLD on the outside of the door shell and CCF inside the door panel. Finish it off with a layer of MLV and you should be able to reduce the overall noise level by 8-10 dB. You’ll also have a big improvement in the quality of your sound system.

I don’t have a clue about the cost. My best guess is $600-$750.
Forgive me for being picky but an 8 to 10 dB is a significant change in noise level. A 9 dB change is a change by a factor of 8 or 1/8 of the sound power or going the other way 8 times the sound power.

I'm not saying you cannot get an 8 to 10 dB reduction but it does seem rather a lot to me.
 
Forgive me for being picky but an 8 to 10 dB is a significant change in noise level. A 9 dB change is a change by a factor of 8 or 1/8 of the sound power or going the other way 8 times the sound power.

I'm not saying you cannot get an 8 to 10 dB reduction but it does seem rather a lot to me.
It is significant and I wish I could give you the exact numbers with documentation, but I have to finish the project before I can do that. I’m going by what I’ve learned through personal experience and conversations I’ve had with several guys on the DIYMA forum.


I took some dB measurements before I started and I’ll use those for comparison when I’m done. They were taken on various roadway surfaces and at various speeds, with the highest reading being 84 dB I think.

The only thing that may make my car different than other forum members is I do not have the original tires. The dealer replaced the tires before I bought the car and I know they’re louder than the factory tires.
 
______________________________

Help support this site so it can continue supporting you!
A quick search on YouTube will show many videos of before and after sound deadening. Pssound has a nice series on a Cheap Sound Quality Car. It currently has 6 parts. Part 1 link. Interesting series to follow showing real world results in a cheap car with reasonably priced equipment.
 
For 8-10db lower noise, I'll easily shell out more than that! I'd travel for it, but leaving the car with someone for a whole day away from home is difficult logistically...)
Where in Michigan? Big differences on what's local if in Traverse City vs Copper Harbor vs Lansing.
 
For 8-10db lower noise, I'll easily shell out more than that! I'd travel for it, but leaving the car with someone for a whole day away from home is difficult logistically...)
8-10db reduction in noise is possible, but it is much more than a 1 day process. In the Pssound video series I linked above, they got 4-6db reduction below 100 hz (road noise) and as much as 10db around 1000 hz. But that was also in a Suzuki Swift which had basically no souund deadening. In higher end cars there tends to be more sound deadening from the factory, which is something they discuss in the video. Some high end cars need nothing. My 2500 HD Duramax took 250+ sq ft of Dynamat Extreme, plus almost 200 sq ft of 1/4" closed cell foam and a bunch of 2 pound per sq ft mass loaded vinyl. I have between 85 and 90% coverage on the interior. The truck is quite enough that people don't realize it's a diesel until they open the door.

The car audio friends I have spend as much as a week on just sound deadening. It really takes getting EVERYTHING apart to build a game plan on what materials to use in what locations and how much of each material will be required.
 
Where in Michigan? Big differences on what's local if in Traverse City vs Copper Harbor vs Lansing.
I'm in south East Michigan (near detroit), but don't mind driving 10h up to Copper Harbor and spend a night in a hotel if it works out!
 
______________________________

Help support this site so it can continue supporting you!
Forgive me for being picky but an 8 to 10 dB is a significant change in noise level. A 9 dB change is a change by a factor of 8 or 1/8 of the sound power or going the other way 8 times the sound power.

I'm not saying you cannot get an 8 to 10 dB reduction but it does seem rather a lot to me.
So I had a Volvo 245 I did an Interior treatment on. Dynamat knock off on the floor, 90% coverage, 75% in the doors. Door all I did was 2 sheets of plastic sheet, I forget how thick. The floor of the car I then added a dynapad knockoff in the rear cargo area the back seat floor pan and over the top of the tunnel. I did a before and after test with cheep dB meter and I dropped right about 8 to 10 dB. The car was significantly quieter. The Buick is already a pretty quiet car to begin with. I know people will disagree here a bit, but it's always gonna depend on your roads and tire choice. For a stock car on stock Conti tires in LA, it's pretty quiet.
 
So I had a Volvo 245 I did an Interior treatment on. Dynamat knock off on the floor, 90% coverage, 75% in the doors. Door all I did was 2 sheets of plastic sheet, I forget how thick. The floor of the car I then added a dynapad knockoff in the rear cargo area the back seat floor pan and over the top of the tunnel. I did a before and after test with cheep dB meter and I dropped right about 8 to 10 dB. The car was significantly quieter. The Buick is already a pretty quiet car to begin with. I know people will disagree here a bit, but it's always gonna depend on your roads and tire choice. For a stock car on stock Conti tires in LA, it's pretty quiet.

Thanks for your data point.

The thing is - Measuring sound level is not simple/straight-forward. I'm not an expert, but I would imagine you need a relatively repeatable environment and position and measurement equipment. I assume you use the same dB meter and drove the car the same way before/after to measure the drop in dB...

Another big factor is what noise level and where you measure from. I.e. if the majority of the noise is from tire and wind, and you put your sound-meter right by your legs, and you're measuring while your car is going over noisy concrete at 80 mph, then the sound insulation you put down in the doors and floor will show GREAT improvement. however, if you put the sound-meter at ear level, where there is still a lot of noise coming through the window and door gap and roof, and/or you're driving a more modest 40 mph on smooth asphalt, then your improvement may be much less. Thats why good test labs usually describe the measurement conditions and methodology.

When you measure your 8-10 dB drop, are you going from 90 dB (probably worst-case I described - high speed over concrete with bad tires) to 80dB? Or did you drop from 60 dB down to 50 dB (super impressive!) Also, are you comparing peak/max dB or some sort of steady-state noise level over 10-30 seconds?
I purchased an app for iPhone and took several measurements with the phone on the dash and on the console, while noting the speed and road surface. The app is legit and I realize the iPhone is not a professional device, but if I take the same measurements post soundproofing the results should be relative.

I have already posted this info on the thread I started for my project. I have a lot of documentation, video, and pics I have not posted yet, but I’ll get there.

 
That last post will take you to the middle of the thread, but here’s a link to my post with the dB readings…

 
______________________________

Help support this site so it can continue supporting you!
This was like 15 years ago lol so I don't remember exactly...I know I did the measurements on similar roads, with the same meter, weighting set the same, and the meter held near my head for the most realistic idea of what the dB actually was at my ears. Thing is unless you have a good quality calibrated meter your really looking for the difference before and after as opposed to an actual number. Even then accuracy would be + - a few dB easily. But measurements taken from a realistic point with consistent measuring techniques, using a weighting scale to roll off the low frequencys that can heavily Influence a reading, and even taking readings that are not rolled off so much is just a good way to do the comparison
 
I intend to start a new thread when I start the project, but for now I’ll just post here. Finally got the last piece for my audio upgrade on order, so now I can post my entire equipment list for this build:

Factory Headunit
PAC AP4-GM61 Integration Interface
Audison AP F8.9 bit DSP/Amplifier
Infinity Kappa One K Monoblock Sub Amp
Front Doors: Infinity REF-6530cx 6.5” Component Set
Rear Doors: Infinity REF-6532ix 6.5” 2-way
Center Dash: Infinity REF-3032cfx 3.5” 2-way
Subwoofer: 10” Infinity Kappa 1000W
Enclosure: Sealed 0.75 cu ft

I got a great deal on the Audison DSP/Amp today and it’s got me really excited about this upgrade. Can’t wait to get started!
whoops, found it! sorry bout that.
 
whoops, found it! sorry bout that.
That list has been modified slightly. Instead of the PAC, I used the Axxess AXDSPX-MST1 factory integration kit. I also installed two subs instead of one.
 
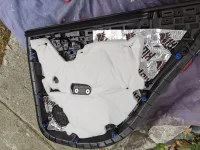
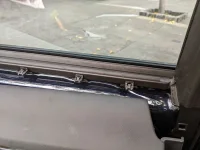
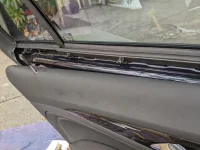
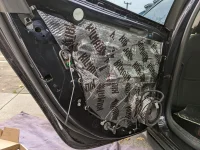
Hey, first of all thank you very much for this thread. I have used it as a bible to insulate my doors with Kilmat. One thing I messed up on and perhaps if you are more experienced, you would not make this mistake, but I put my panel ON very differently than I took it off. To replace the door card, I removed ALL of the metal clips at the top and reassembled them on the door, with the window squeegee thing. (I knew to replace the blue peg clips, just not the top metal ones). That made it WAY more easy to push the whole door card on straight. Again, rookie mistake to not do this, but figured I would share this tidbit and a photo. I know it was mentioned here, but I wanted to stress this. I broke one metal clip making this mistake, so I am hoping this will help others. I was able to position the blank with no clip in the middle to minimize effect. I also included two trophy photos of my Kilmat! PXL_20221222_190220896.jpgPXL_20221222_192012421.jpgPXL_20221222_192015586.jpgPXL_20221222_190225826.jpg
 
Last edited:
Back
Top