2005 LeSabre Instrument and Dash Lighting

DrivenDaily

Well-known member
Joined
Feb 20, 2024
Messages
773
Reaction score
423
Points
63
Buick Ownership
2005 LeSabre Limited
While it is still a work in progress, I wanted to share part of my journey with replacing and upgrading the lights in the dash, which illuminate the HVAC, headlight controls, and the gauges.

I would have included the radio, but since it is in the process of being replaced, I chose not to change the lighting in it.

ALL of the button and gauge illumination is done with tiny incandescent bulbs, all of which are soldered in place. That's right! No sockets.

The HVAC head unit is the one that gave me the most fits. Its design leaves little or no room to replace the six (6) bulbs with 5 green 3mm LEDs and one white 5mm LED, but that is what I did. Actually, after replacing them, reassembling the control face into the back portion that snaps into the dash was impossible. It lacked about 1/16" (or about 1.5mm) of letting me stuff the repaired control face into the rear cavity, so after about 3-4 hours of repairs and failed attempts to reassemble it, I opted buy one off of Flea Bay. It should arrive this week . . .

The headlight control was the easiest one to do. There are 4 bulbs in it that are even tinier than in the HVAC or gauges, and I was able to replace them with 1.8mm green LEDs in about 2 hours.

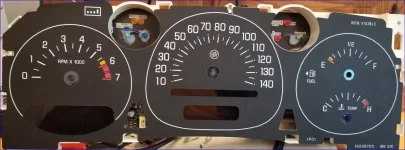
The gauges were my biggest concern since the tach was completely dark, the speedo had only one remaining bulb that lit up the speeds from about 100 to 140, whereas the fuel and coolant temp were fairly well lit.

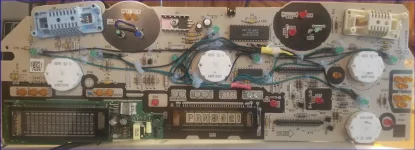
In the image below you can see eight 5mm green LEDs with wires in what looks like a mess. OK, it is, but it works. Those 8 LEDs are for the gauges themselves. There are 3 more bulbs for the turn and high beam indicators inside the black circles at the top of the board. For the high beam I used a 5mm blue LED, and for the turn signals I used 3mm green LEDs. Interestingly, the 3mm LEDs are brighter than the 5mm LEDs! I need to experiment to see if I need to add some ND stickers to reduce the brightness once I add the cover.

Since the original bulbs were soldered in and their bases were attached to the bulbs and not the PC board, I chose to use hot glue to locate them in the same positions, and then route the wires to a convenient spot on the board, cutting the leads and soldering all of the positives together and all of the grounds together. When test-fitting the faces, I found it was necessary to move the group of positive leads, which are protected by a red heat shrink tube. They prevented the plastic shrouds around the stock LEDs from fitting tightly against the board.
Screenshot 2025-06-09 000753.webp

Screenshot 2025-06-09 000829.webp


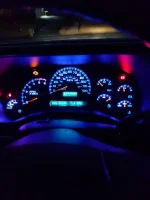
Illumination at night, with the brightness at its lowest level. Clear cover is not installed yet:

Screenshot 2025-06-09 000945.webp
 
Wowwie, nice work! 👍

Mbe show your steps to get it apart?
Crazy ass question.. would the car run without the gages? (sending it out to replace the step motors)
 
Last edited:
Wowwie, nice work! 👍

Mbe show your steps to get it apart?
Crazy ass question.. would the car run without the gages? (sending it out to replace the step motors)
Thanks. It was a chore!!!

I spent around 4 hours on just the gauges, another 3-4 on the HVAC (and still failed!), and about 2 hours on the headlight control lighting.

It runs fine without the gauges. Every time you unplug the gauges, the Avg MPG will reset to zero.

I didn't take pics to disassemble, but it was fairly straight-forward. Most of my help came from Crutchfield, but even their instructions were a bit sketchy!

Remove both end panels, un-snap the wood grain to left of steering wheel (SW), remove knee bolster below SW, carefully un-snap wood grain to right of SW.

Carefully un-snap and remove entire dash and gauge facia/bezel.

To remove the gauges (instrument panel cluster, aka IPC), remove a single bolt (10mm socket) from left end panel to allow you to lift that end of the padded dash cover, then remove bolts and snappy things to remove the IPC. Set the parking brake since you will need to move the shifter to L, and tilt the SW down and back up to clear the little collar around the steering column cover. It's kinda tricky, and you have rotate the IPC to get it out of the hole it's in.

There are 2 plugs installed in the vehicle behind the IPC. The larger left one in my car was loose enough that it slid up and backward, preventing the IPC from connecting. I thought my IPC was dead for a New York Minute! After seeing it was out of position, I balled up a paper towel to keep it down in place and it didn't do that again.

Just so you know, all 4 of the steppers in my IPC are the same part number. They are available if you want to DIY and save some money.
 
While it is still a work in progress, I wanted to share part of my journey with replacing and upgrading the lights in the dash, which illuminate the HVAC, headlight controls, and the gauges.

I would have included the radio, but since it is in the process of being replaced, I chose not to change the lighting in it.

ALL of the button and gauge illumination is done with tiny incandescent bulbs, all of which are soldered in place. That's right! No sockets.

The HVAC head unit is the one that gave me the most fits. Its design leaves little or no room to replace the six (6) bulbs with 5 green 3mm LEDs and one white 5mm LED, but that is what I did. Actually, after replacing them, reassembling the control face into the back portion that snaps into the dash was impossible. It lacked about 1/16" (or about 1.5mm) of letting me stuff the repaired control face into the rear cavity, so after about 3-4 hours of repairs and failed attempts to reassemble it, I opted buy one off of Flea Bay. It should arrive this week . . .

The headlight control was the easiest one to do. There are 4 bulbs in it that are even tinier than in the HVAC or gauges, and I was able to replace them with 1.8mm green LEDs in about 2 hours.

The gauges were my biggest concern since the tach was completely dark, the speedo had only one remaining bulb that lit up the speeds from about 100 to 140, whereas the fuel and coolant temp were fairly well lit.

In the image below you can see eight 5mm green LEDs with wires in what looks like a mess. OK, it is, but it works. Those 8 LEDs are for the gauges themselves. There are 3 more bulbs for the turn and high beam indicators inside the black circles at the top of the board. For the high beam I used a 5mm blue LED, and for the turn signals I used 3mm green LEDs. Interestingly, the 3mm LEDs are brighter than the 5mm LEDs! I need to experiment to see if I need to add some ND stickers to reduce the brightness once I add the cover.

Since the original bulbs were soldered in and their bases were attached to the bulbs and not the PC board, I chose to use hot glue to locate them in the same positions, and then route the wires to a convenient spot on the board, cutting the leads and soldering all of the positives together and all of the grounds together. When test-fitting the faces, I found it was necessary to move the group of positive leads, which are protected by a red heat shrink tube. They prevented the plastic shrouds around the stock LEDs from fitting tightly against the board.


View attachment 48889

View attachment 48890


Illumination at night, with the brightness at its lowest level. Clear cover is not installed yet:

View attachment 48891
doesnt this cause the lighting to become unreliable and flicker when you use the dimmer switch?
LED like PWM not voltage variation
The tachometrer and the right gauges look like they may be showing this issue potentially

If you want to dim the warning/indicator lights that dont dim, like brights , that actually may be possible to do through tuning/programming. The cluster is class 2 and they did this on the 2003-2007 gmt800 trucks , mine has a TSB for flashing the cluster to turn the brightness on that down
 
______________________________

Help support this site so it can continue supporting you!
It all depends on what your time is worth. Many people would rather pull the cluster out and send it off to get refurbished by a place that does this as a business. Last time I checked places were charging about 150 to do the job. 10 hours works out to 1.50 an hour. It all depends on if you have the patience and experience to take on such a job. I'd be willing to bet that most Buick owners would rather have the professionals do it because removing the instrument cluster is the easy part.
I applaud your perseverance to repair it yourself but if mine ever needs to be fixed I'm sending it out. Just my 2 cents.☺️
I completely agree with your sentiment and your choice!

I did a DIY because that's how I've lived so much of my life that it's just second nature: Broke? I.Fix.It.

I found it an enjoyable task for the day+ that I spent on it, but at that price, I didn't make out too well saving only $15/hour. (Your math is off by a single decimal point, but it's still a valuable observation.) Not too many years ago, $15/hour was better than entry-level pay!

On top of that, I learned other things along the way, but I'll probably never use them... Oh well.

Wednesday evening will be the first time that I actually drive it at night. I sat it in the other night and it looks really nice so far.

Perfect? No. The lighting is "blotchy" because the LEDs don't distribute light in the same pattern as the original bulbs. But I really like the color.

doesnt this cause the lighting to become unreliable and flicker when you use the dimmer switch?
LED like PWM not voltage variation
The tachometrer and the right gauges look like they may be showing this issue potentially

If you want to dim the warning/indicator lights that dont dim, like brights , that actually may be possible to do through tuning/programming. The cluster is class 2 and they did this on the 2003-2007 gmt800 trucks , mine has a TSB for flashing the cluster to turn the brightness on that down
To dim the T/S and/or high beam, I have stickers (some round, some rectangular) that I've used for similar dimming. That is what I plan to use.

To answer your question: No, they do not appear to flicker. However, as noted above, when I drive it at night for the first time, I will pay special attention to see if they flicker or not. The dimmer works, and I'll test that as well to see if it has a large enough range of dimming.
 
I completely agree with your sentiment and your choice!

I did a DIY because that's how I've lived so much of my life that it's just second nature: Broke? I.Fix.It.

I found it an enjoyable task for the day+ that I spent on it, but at that price, I didn't make out too well saving only $15/hour. (Your math is off by a single decimal point, but it's still a valuable observation.) Not too many years ago, $15/hour was better than entry-level pay!

On top of that, I learned other things along the way, but I'll probably never use them... Oh well.

Wednesday evening will be the first time that I actually drive it at night. I sat it in the other night and it looks really nice so far.

Perfect? No. The lighting is "blotchy" because the LEDs don't distribute light in the same pattern as the original bulbs. But I really like the color.


To dim the T/S and/or high beam, I have stickers (some round, some rectangular) that I've used for similar dimming. That is what I plan to use.

To answer your question: No, they do not appear to flicker. However, as noted above, when I drive it at night for the first time, I will pay special attention to see if they flicker or not. The dimmer works, and I'll test that as well to see if it has a large enough range of dimming.
if it doesnt seem to like being dimmed, then you can get creative and use the dimmer to control a PWM dimmer, and then use that to control the dash and or other stuff

There is a chance they used PWM for the dimming , im not looking it up rn but if it was already thats good
 
I found a guy in SE MN n Fleebay to rebuild my '05 2500 Silverado cluster where everything failed. I removed it in 15-min, put it in a well padded box & sent it to him. Once it arrived, he replaced all the lights with blue LED's & replaced all the stepper motors the same day then shipped back to me in the same box with a LIFETIME warranty. The whole process was about $100.00 including shipping. My total time to remove & replace was 30-min. That was 2-yrs ago & still working perfect!

1749620298160.webp
 
Last edited:
______________________________

Help support this site so it can continue supporting you!
I found a guy in SE MN n Fleebay to rebuild my '05 2500 Silverado cluster where everything failed. I removed it in 15-min, put it in a well padded box & sent it to him. Once it arrived, he replaced all the lights with blue LED's & replaced all the stepper motors the same day then shipped back to me in the same box with a LIFETIME warranty. The whole process was about $100.00 including shipping. My total time to remove & replace was 30-min. That was 2-yrs ago & still working perfect!

View attachment 48900
i need to get me some steering whel controls so i can see how much i dont get any fuel economy
 
^^^^Woah, I like that!
 
i need to get me some steering whel controls so i can see how much i dont get any fuel economy
You would also need the cluster to go along with the steering wheel controls. There are several different ones used in those years. Mine has the 8.1L with Allison trans, hence the trans fluid temp sensor. What engine & trans do you have?
 
You would also need the cluster to go along with the steering wheel controls. There are several different ones used in those years. Mine has the 8.1L with Allison trans, hence the trans fluid temp sensor. What engine & trans do you have?
all fully digital clusters in the gmt800 (03+) are compatible with steering wheel controls, once you have the controls you gain the additional options.
mine is that cluster. there could be non-fully digital ones in the half tons and utilities with a printed PRND321 and an indicator light up to selected gear
 
______________________________

Help support this site so it can continue supporting you!
I need to get my climate control bulbs done. I have one bulb working haha. I was gonna do it myself, but I heard its a pita.
 
I need to get my climate control bulbs done. I have one bulb working haha. I was gonna do it myself, but I heard its a pita.
It is!

I spent 3+ hours and could not reassemble the face into the body.

I spent $120 on an eBay part from a 2002 with perfect-looking buttons and display. The issue? All SIX of the lights for the buttons are burned out, just like the one in my 2005!

Looks like I just found another project for this weekend, eh? Gonna try to use the innards from my 2005 and get them to fit if I can. If not, I'll attempt it on the "new" item.
 
I have 2 or 3 HVAC displays in stock. All the bulbs for the buttons are burned out. I may have one of them repaired but it's not at the top of my priority list. I have other things to address first like crusty brake lines.
 
Back
Top