-
This section is for help and assistance with 2018 and NEWER Buick Regals. If you need assistance with a 2011-2017 Buick Regal, CLICK HERE. If you need assistance with a 2010 or older Buick Regal, CLICK HERE. This notice may be dismissed by clicking the X in the right corner.
-

- Buick Forums
- Past Buick Vehicle Discussion
- Buick Regal Forums
- 2018+ Buick Regal Sportback and TourX Forum
You are using an out of date browser. It may not display this or other websites correctly.
You should upgrade or use an alternative browser.
You should upgrade or use an alternative browser.
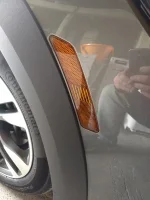
Does anyone know how to remove these?
- Thread author Wlepse
- Start date
Wlepse
SUPER STAR!
- Joined
- Mar 18, 2019
- Messages
- 1,793
- Reaction score
- 883
- Points
- 113
- Location
- NNJ
- Buick Ownership
- 2018 Regal TourX Essence
Yeah that is what I was thinking but sometimes there is a trick and since it is cold enough here to make the plastic brittle and was raining I wasn't going to push my luck.Looks like it's done from the other side of the fender. Perhaps they simply pop out or are actually fastened in place.
-Regal-
Series I 3800 member
- Joined
- Oct 23, 2019
- Messages
- 1,514
- Reaction score
- 443
- Points
- 83
- Buick Ownership
- 1993 Buick Regal Limited coupe 3800
How is tinting done? Can you just place it on as is and trim with a razor?
Wlepse
SUPER STAR!
- Joined
- Mar 18, 2019
- Messages
- 1,793
- Reaction score
- 883
- Points
- 113
- Location
- NNJ
- Buick Ownership
- 2018 Regal TourX Essence
I did try that but from a few angles I could still see the yellow as it rounds into the bumper cover. I tried to get it to wrap around then cut but I wasn't happy with the results. I think I really need to get them out and use a bit of heat to form the sheet around the shape better. Then I can cut it against the housing maybe an eighth or so in so all you see is tint. Or at least that was my plan...I suck at applying films so this maybe a complete bust for me.
BoostedRegal2.0
SUPER STAR!
- Joined
- Dec 16, 2018
- Messages
- 1,815
- Reaction score
- 768
- Points
- 113
- Buick Ownership
- 2014 Regal 2.0 Turbo AWD Trifecta Tune
Just mask it off with tape and spray it with night shades tint.
L J
SUPER STAR!
- Joined
- Nov 24, 2018
- Messages
- 2,371
- Reaction score
- 670
- Points
- 113
- Buick Ownership
- Regal TourX
Hammer and crow bar should get that sucker out.
Anaduff
Associate Member
- Joined
- Nov 8, 2018
- Messages
- 1,002
- Reaction score
- 865
- Points
- 113
- Location
- St. Paul, Minnesota
- Buick Ownership
- 2019 Insignia GS, 2003 Jaguar X-Type
Then the question becomes, 'How do you tint a hole?'.
If I were GM marketing, I suppose I could say that that is where the retractable curb feelers deploy (if equipped).
If I were GM marketing, I suppose I could say that that is where the retractable curb feelers deploy (if equipped).
landsharkmz3
Active member
- Joined
- May 22, 2019
- Messages
- 300
- Reaction score
- 200
- Points
- 43
When the shop did mine, I am pretty sure they didn’t remove the marker lights. I assumed they used a little trim tool and knife to cut and tuck until it was right. If I look very very close it’s not 100% perfection, but not something I notice at all.
Attachments
Wlepse
SUPER STAR!
- Joined
- Mar 18, 2019
- Messages
- 1,793
- Reaction score
- 883
- Points
- 113
- Location
- NNJ
- Buick Ownership
- 2018 Regal TourX Essence
Txs for letting me know but there are two problems. First...I suck and they were pros. Second...I am the type of person who only sees my screw ups. If someone else does it I don't pay as much attention.When the shop did mine, I am pretty sure they didn’t remove the marker lights. I assumed they used a little trim tool and knife to cut and tuck until it was right. If I look very very close it’s not 100% perfection, but not something I notice at all.
2007LucerneCXL
Full Member
- Joined
- Jun 19, 2015
- Messages
- 12,835
- Reaction score
- 4,789
- Points
- 113
- Location
- Illinois
- Buick Ownership
- 2007 Lucerne CXL. and 1995 Lesabre currently, past 1973 Riviera, 1968 Riviera
It may be accessible from the wheel well. You may want to look at removing the liner, tire off would give the the extra room, and you may be able to see the mounting hardware on the light to remove. Or stop by or call the dealer and ask how to change the bulb. If trying to still do it yourself a plastic razorblade with a rounded corner works for tucking material in without scratches, not sure on the type of material you are using.

sined240
Member
- Joined
- Jan 1, 2019
- Messages
- 91
- Reaction score
- 19
- Points
- 8
- Buick Ownership
- 2018 Regal TourX
There is a liner screw on the bottom and two plastic clips on the wheel liner side, all removed easily when you turn the wheel to one side for better access. Once the liner is pulled back, there are two 10mm fastener right at the corner of the bumper nearest to the wheel that needs to be removed. Then the bumper can be tugged down and out, which pops it out. The black trim interlocks, so there is an initial tug.
To install bumper, get the big tab and guide the edge upwards and push in while aligning the whole bumper, and will slide right in.
To install bumper, get the big tab and guide the edge upwards and push in while aligning the whole bumper, and will slide right in.
Wlepse
SUPER STAR!
- Joined
- Mar 18, 2019
- Messages
- 1,793
- Reaction score
- 883
- Points
- 113
- Location
- NNJ
- Buick Ownership
- 2018 Regal TourX Essence
Perfect thanks...I will wait for warmer temps so I don't have to worry about brittle plastics.There is a liner screw on the bottom and two plastic clips on the wheel liner side, all removed easily when you turn the wheel to one side for better access. Once the liner is pulled back, there are two 10mm fastener right at the corner of the bumper nearest to the wheel that needs to be removed. Then the bumper can be tugged down and out, which pops it out. The black trim interlocks, so there is an initial tug.
To install bumper, get the big tab and guide the edge upwards and push in while aligning the whole bumper, and will slide right in.
kevjam79
Active member
- Joined
- Nov 3, 2019
- Messages
- 179
- Reaction score
- 71
- Points
- 28
- Location
- Missouri
- Buick Ownership
- 2018 Buick Regal Sportback Pref. Grp. II
When the shop did mine, I am pretty sure they didn’t remove the marker lights. I assumed they used a little trim tool and knife to cut and tuck until it was right. If I look very very close it’s not 100% perfection, but not something I notice at all.
Good tinting job. I would recommend a pair of these side marker lights to finish off the look: Smoked Lens Sequential Full LED Amber Side Marker Lights For 2018-up Buick Regal | eBay
Also based on the pictures in this Ebay sale... a person maybe be able to slide their hand up under bumper cover at the fog light access opening and pressurize the bottom clip and pop the bottom end out and the entire long side marker should fall out: Brand New 2018 - 2019 Buick Regal TourX Side Marker Lamp Right OEM 39143628 | eBay
Wlepse
SUPER STAR!
- Joined
- Mar 18, 2019
- Messages
- 1,793
- Reaction score
- 883
- Points
- 113
- Location
- NNJ
- Buick Ownership
- 2018 Regal TourX Essence
And those side markers are why I feel like I need to tint these. Those were in my stocking from Santa. those pictures will really help, at least now I know where the clips are.Good tinting job. I would recommend a pair of these side marker lights to finish off the look: Smoked Lens Sequential Full LED Amber Side Marker Lights For 2018-up Buick Regal | eBay
Also based on the pictures in this Ebay sale... a person maybe be able to slide their hand up under bumper cover at the fog light access opening and pressurize the bottom clip and pop the bottom end out and the entire long side marker should fall out: Brand New 2018 - 2019 Buick Regal TourX Side Marker Lamp Right OEM 39143628 | eBay

Wagon Man
Member
- Joined
- Jan 3, 2020
- Messages
- 37
- Reaction score
- 12
- Points
- 8
- Buick Ownership
- Wagon, soon
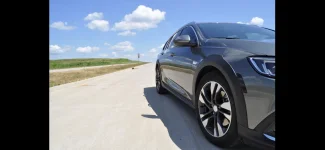
Got the same question: Are the external ugly plastic trim pieces around the wheel wells removable?
glued, fastened with clips, or indeed screwed in place?
(not sure I understand the above posts: OP wants to remove them for tinting, then re-instal?)
If I can’t get mine off and in the dumpster, I may consider painting to match the body color, not sure removal would be necessary: A good body shop should be able to spray with the pieces in place...?
Don’t have the X yet, will cross that bridge later, but those pieces look hokey and out of place on a previously elegant Wagon:

 | ||||
| | | | | |
| | | |||
