• This section is for help and assistance with 2018 and NEWER Buick Regals. If you need assistance with a 2011-2017 Buick Regal, CLICK HERE. If you need assistance with a 2010 or older Buick Regal, CLICK HERE. This notice may be dismissed by clicking the X in the right corner.
  • Car enthusiast? Join us on Cars Connected! iOS | Android | Desktop

Focus: Audio Upgrade Wagon

768mph

Active member
Joined
Apr 13, 2020
Messages
95
Reaction score
106
Points
33
Buick Ownership
2019 Tourx Essence
Going to focus in a decent audio improvement with the Wagon.

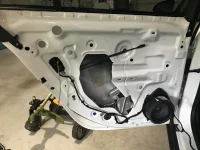
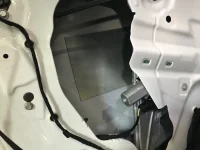
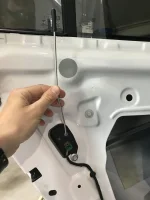
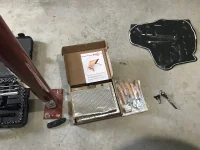
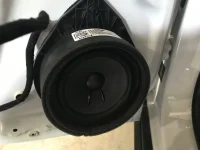
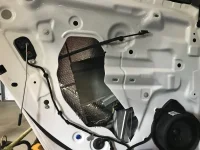
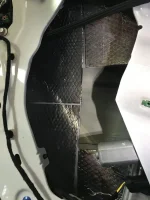
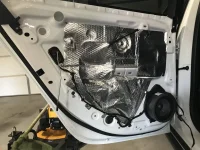
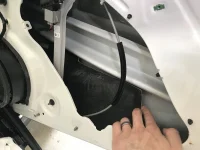
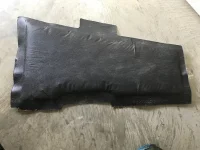
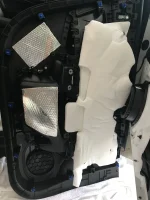
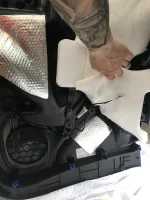
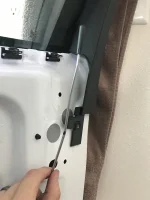
Starting off with the use of Sound deadener in the truck and subwoofer area.

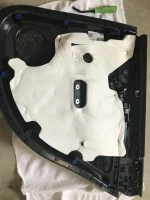
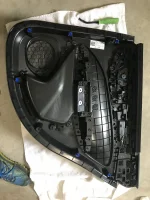
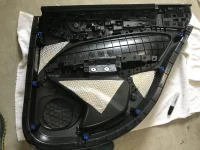
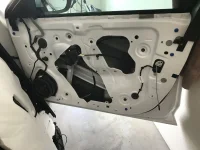
Results- tighter bass and when pushed over halfway; doesnt get muddy but the doors start showing their need for deadener as well.

GT Mat- 80mil thick.83203D28-DA6F-4F47-9425-9CB7D3DC9CF7.jpegD8E1EF0A-4C66-46B9-929B-A3D4CD7745CE.jpegAEE51297-BAC3-44E2-9F06-03F253BBCF91.jpegC082B3FA-E558-452D-BB4A-6C01F4B02A39.jpeg13A13EF2-DBF1-467A-BFEF-EC40175A61C7.jpeg29D1C243-2C0F-4749-9B37-CEE9EAE486C1.webp
 
How much does that stuff run?
 
How much does that stuff run?
Redx,

I purchased this stuff about 8 years ago and had some left over.
I think I purchased 60sqft for $80 or so. 80mil is THICK. 50-70mil is the common thickness.

Ill say this, this took all of 30 min to do. They have rollers you can use but mine was lost (in a house fire) long ago. So I used a tennis ball. Perfect.

The doors, done properly, is where it makes the Significant difference.


From a previous build with a G8 GT
My new focus: Audio upgrade
 
768,
Just curious, but there seems to be a lot of bare metal areas where you didn't put the sound deadener. Was that by design or just the amount of material you had available?

It’s by design, you dont need to have 100% coverage to provide great results. It still solidifies and provides a great sound barrier.

If I were building a professional SQ build, it would be 100% coverage. But that adds weight, time, and this car wont be utilized like a professional sound stage.

If you look closely (or in your vehicle) youll see the gray/green pieces that contrast my addition of GT Mat. Thats factory sound deadener that Buick laid out (and skimmed.)
 
For the most part you can get away with 60% coverage. I've bought from rammat, way cheeper than dunamat, never had any issues with it coming off, and it does just what it should do, deaden the panels.

So dude, this gonna be a step by step thread with results? Just what I've been waiting for. Even with the Bose system it's so disappointing. It's bizzar, the sub will lick over half volume or so, but the rest of the system noticably flattens out in weird ways. Playing some pop but more EDM stuff it actually sounds ok, but try and do something smooth and silky, the tweeters rip your head off and the whole thing is mudddy and grainy. I do like how the lock knobs rattle in their little escutcheon when the doors are lock and you get bass in the speakers.

I'm guessing the doors are next?
 
For the most part you can get away with 60% coverage. I've bought from rammat, way cheeper than dunamat, never had any issues with it coming off, and it does just what it should do, deaden the panels.

So dude, this gonna be a step by step thread with results? Just what I've been waiting for. Even with the Bose system it's so disappointing.

I'm guessing the doors are next?

Yes, this is intended to be a step by step thread. Much like my previous thread (G8Board). Ill see what I can do to make this a nice (frugal) change...but i know i will eventually turn it upside down and get more invasive. Haha

More to come...
 
Redx,

I purchased this stuff about 8 years ago and had some left over.
I think I purchased 60sqft for $80 or so. 80mil is THICK. 50-70mil is the common thickness.

Ill say this, this took all of 30 min to do. They have rollers you can use but mine was lost (in a house fire) long ago. So I used a tennis ball. Perfect.

The doors, done properly, is where it makes the Significant difference.


From a previous build with a G8 GT
My new focus: Audio upgrade

You can use good old roofing Aluminum Peal and Seal as a 3rd cheaper alternative at Home Depot. I used it in my Regal with the factory Bose and it helped A LOT on the front doors and rear deck lid. Think it’s thicker but I haven’t had any issues with it not staying.. That I know of.. Haven’t had either of the front door panels off in a few years LOL!
 
______________________________

Help support this site so it can continue supporting you!
Yes, this is intended to be a step by step thread. Much like my previous thread (G8Board). Ill see what I can do to make this a nice (frugal) change...but i know i will eventually turn it upside down and get more invasive. Haha

More to come...
Awesome. I am happy to watch this progress.

I would like to make the most of the original Bose system to start with, then evaluate if I am going to do any component swaps. While I like good quality audio, I am simply not willing to take on the time, expense, and scope of ripping it out and starting over. I also don't want to permanently alter the interior panels or take away usable cargo space.
 
Great thread, @768mph thanks for posting! This is an idea I've also been toying with, I am glad to hear it makes a big difference. Thanks for mentioning that stuff Buick put in (skimpily it seems) - that is good to know and another good reason for adding this.

30% chance I may go that Home Depot route. A quick google shows lots of mixed results with asphalt smells in summer using Peal n Seal. This one clearly requires a deep dive, but I don't mind doing some research...I find it fun. Thanks for mentioning that, @JacupV.

I agree the doors are a MAJOR weak point for audio vibration issues. Mine rattle like the dickens if the Bose settings are fully utilized. So what good is an audio system if you can't take advantage of it? My previous Buick service manager offered to pay for getting them matted if I got him an estimate -- b/c of the rattles. I got busy, let it slide. I understand he "left" that dealer...guessing he was too good to the customers. He really did care about solving problems, even if it cost more money.
 
Last edited:
Great thread, @768mph thanks for posting! This is an idea I've also been toying with, I am glad to hear it makes a big difference. Thanks for mentioning that stuff Buick put in (skimpily it seems) - that is good to know and another good reason for adding this.

30% chance I may go that Home Depot route. A quick google shows lots of mixed results with asphalt smells in summer using Peal n Seal. This one clearly requires a deep dive, but I don't mind doing some research...I find it fun. Thanks for mentioning that, @JacupV.

I agree the doors are a MAJOR weak point for audio vibration issues. Mine rattle like the dickens if the Bose settings are fully utilized. So what good is an audio system if you can't take advantage of it? My previous Buick service manager offered to pay for getting them matted if I got him an estimate -- b/c of the rattles. I got busy, let it slide. I understand he "left" that dealer...guessing he was too good to the customers. He really did care about solving problems, even if it cost more money.

No problem. Interesting I didn’t notice any extra smells and it’s been in for a few years now. I don’t even remember it smelling all that much even working with it. Maybe a bit extra over dynamat but it went away and at a tenth of the cost, I’m ok with that 😂
 
I'm telling ya guys check out rammat, no where near the cost of the dynamat and it's made for this purpose. No I'm not a sponsor lol just a really good product, I've used their stuff in 3 vehicles. Don't wanna hyjack this thread but with their dynamat like deadner and the ensolite foam as a decoupler, a sheet of MLV rubber on the floor pan, deadner sheets on the door and sealing the doors in my wife's Honda fit I cut out over 10db of road noise in that car. So worth it
 
______________________________

Help support this site so it can continue supporting you!
Round 2- Sound Deadener in the Hatch.

Results: even better sound and all encompassing Bass tones. Bass is tigher and not muddy when turned high volume. The sound is more full.

Unfortunately I could not do much coverage as most holes are for the attachment of this hatch panel. And I only had a small amount remaining.

Doors are next!

Tools:
Body panel puller
9/16” nut driver for 4 screws.

How to:
-Body panel puller, remove the tail light access panels (takes 0 effort)
-remove 2 bolts by First Aid Kit straps
-Body panel puller the handle and release covers to reveal two more bolts
-yank (hard) by placing hands within tail light access panels BUT be careful not to yank off. There is a connection for automatic tailgate
- Remove the connection, only 1 side has the release tab (faces passenger side of car)
- Reassemble same order5C9B745B-7347-495B-B4AE-60E205F9B536.jpeg805226F4-9FBA-4232-B5DD-5FF1338886BD.jpeg36AA7543-31D7-46B1-AA1B-1331EE1A7BD1.jpegB3C6C620-8B73-428B-8AB5-FD48B4674BE4.jpegC8B7CF78-826D-4281-BECB-CEC864D4633C.jpeg843BED7C-3AEC-4924-AC0A-C3C33AAE2D9E.jpegEA33EF3E-70EC-4690-8728-8E6E43D420F4.jpeg56C0320B-D88B-490B-BB50-FCE8DD7F3880.jpegF76A3D85-8969-4907-8433-E498E8C480BD.jpeg763DBAE6-D026-4F8A-A4B1-BB4AFB5DC386.jpeg
 
Last edited:
Well after driving around today, noticed some interesting discoveries. Consistent with sound deadening, and always a pleasant before and after difference.
I have noticed now bass tones and music can be felt in my seat and floorboards and now i can see my rearview mirror shake on the beats of the music. Ive never seen it move before.
As I have stated before, music is much more full now. I am always pleased on the positive results sound deadening can produce. I suspect when I do the doors, is where it will really shine.

Music was played through my Carplay and artist was Lindsay Sterling.
 
______________________________

Help support this site so it can continue supporting you!
Ok Gentlemen,
I have this coming to do all four doors. I also may pull off the tailgate and finish the rest.
Im struggling not to change the speakers at the same time but curious to see the difference with stock speakers; i’ll wait and do those later.

More to follow.
 

Attachments

  • F82577AC-2C84-42A5-AAB6-1642ED0477DD.webp
    F82577AC-2C84-42A5-AAB6-1642ED0477DD.webp
    131.7 KB · Views: 49
What is the plan before the speakers are replaced? I'm torn, I know the factory amp has wierd rolloffs when the volume is cranked, and the eq in the factory dsp seems like garbage. I can't bring myself to change speakers when what's going into them has been muddled with so much. But I'm not convinced the speakers espically the tweeters really are just garbage. My plan at some point is to dump the stock amp and replace with an amp and dsp.
 
Round 3:
Sound deaden the doors!

Ok after about 5 hours, I’m done.

Lessons learned:
20sqft of Deadener (used every sq in)
Tools
7mm nut driver
Body panel puller
Small flat head (for connections)

Rear doors:

Placed deadener inside the door skin and the outer layer. The rear doors are easier. The clips are very secure, you will have to pull and HARD. The clips up top by the windows WILL come off. Remove them and place them back on the door before reassembly. Much easier.
I discarded the original door internal covering. But retained the white cotton panel cover. Also placed deadener on the flat weak spots.

Front doors:

Placed deadener inside the door akin and the outer layer. Strange there is a foam pad inside the door, I removed for deadening and put back. I modified the original door internal covering; cut in half and deadened over top to add stability. It was much too big an open space to keep laying deadener.
I again retained the white cotton panel cover. Also placed a strip of deadener on the flat weak spots.
AND placed little sound deadening strips where the door lock bars go on the door panel; no more buzzing lock.

Result!!
I’m glad I did this and also before any aftermarket speakers. The sound is so full and smooth. Bass is clear, mids are full, and highs are crisp.

First thing I had to do was turn down my equalizer to near FLAT. Maybe +1 on bass and +3 on treble. It’s that big of a difference. 👌
 

Attachments

  • 19DFFDBC-808E-4F6F-8F7E-5FAAFA00630C.webp
    19DFFDBC-808E-4F6F-8F7E-5FAAFA00630C.webp
    128.3 KB · Views: 87
  • A9A6B810-9A39-4E5D-94FD-A77D346060FE.webp
    A9A6B810-9A39-4E5D-94FD-A77D346060FE.webp
    92.8 KB · Views: 84
  • D444AC2C-64FD-492B-8ABD-CE5C29488943.webp
    D444AC2C-64FD-492B-8ABD-CE5C29488943.webp
    173 KB · Views: 82
  • C6A6FA56-FE27-420D-AE9E-5102007E73B5.webp
    C6A6FA56-FE27-420D-AE9E-5102007E73B5.webp
    179.6 KB · Views: 82
  • 6BF6CF4B-792D-4DB7-8FA3-861B56FB2B01.webp
    6BF6CF4B-792D-4DB7-8FA3-861B56FB2B01.webp
    97.2 KB · Views: 80
  • 118A48C7-538E-43C6-9922-270C82D54CA1.webp
    118A48C7-538E-43C6-9922-270C82D54CA1.webp
    83.1 KB · Views: 78
  • E7485BB1-A3CB-47B2-A7DA-718E90566260.webp
    E7485BB1-A3CB-47B2-A7DA-718E90566260.webp
    209.8 KB · Views: 84
  • 4F509A0C-E715-42A9-A8F5-BCCC47B6E5BF.webp
    4F509A0C-E715-42A9-A8F5-BCCC47B6E5BF.webp
    80.3 KB · Views: 83
  • 0F3B212A-CB3C-4CB3-B53D-3FD2DB5DEF95.webp
    0F3B212A-CB3C-4CB3-B53D-3FD2DB5DEF95.webp
    145.7 KB · Views: 84
  • 3A726287-06EF-4301-A9E1-7156D350577C.webp
    3A726287-06EF-4301-A9E1-7156D350577C.webp
    171.8 KB · Views: 83
Last edited:
Second post for pictures
 

Attachments

  • 19C593E7-C27B-4768-B1CF-D172BACCE3C7.webp
    19C593E7-C27B-4768-B1CF-D172BACCE3C7.webp
    226.9 KB · Views: 69
  • 6D9E1537-8916-48B8-AF39-3D03F29BCD00.webp
    6D9E1537-8916-48B8-AF39-3D03F29BCD00.webp
    243.9 KB · Views: 64
  • 61D8513D-2EA8-473E-8250-600BFA2B146F.webp
    61D8513D-2EA8-473E-8250-600BFA2B146F.webp
    53.5 KB · Views: 60
  • 081CA992-C12B-41B9-B704-7E8BF5ECEF0D.webp
    081CA992-C12B-41B9-B704-7E8BF5ECEF0D.webp
    123 KB · Views: 62
  • F92CECE4-CEFD-484E-A4D0-40EE01D54B87.webp
    F92CECE4-CEFD-484E-A4D0-40EE01D54B87.webp
    87.6 KB · Views: 61
  • 29D6A54E-563A-4CB1-BA8E-27943A9855B8.webp
    29D6A54E-563A-4CB1-BA8E-27943A9855B8.webp
    387.1 KB · Views: 60
  • 74BEED33-17F4-4DD0-884B-411D9472FC10.webp
    74BEED33-17F4-4DD0-884B-411D9472FC10.webp
    158.6 KB · Views: 58
  • 862B7F39-43E2-4BDE-83A6-1BA74A41D234.webp
    862B7F39-43E2-4BDE-83A6-1BA74A41D234.webp
    155.5 KB · Views: 61
  • 43105531-B294-44C1-A240-DF978EC13F71.webp
    43105531-B294-44C1-A240-DF978EC13F71.webp
    71.4 KB · Views: 61
  • 435DC20B-8629-41E0-B355-F126798039B0.webp
    435DC20B-8629-41E0-B355-F126798039B0.webp
    86.9 KB · Views: 64
Back
Top