
mjspiess
Full Member
- Joined
- Jul 23, 2013
- Messages
- 25
- Reaction score
- 3
- Points
- 3
- Buick Ownership
- Buick
After lots of research and some trial and error, I was able to retrofit a heated steering wheel into my wife's 2013 Buick Encore. This mod should work for any 2013+ Buick Encore. This thread is more of a proof of concept. If the demand is high enough, I will sell individual kits that will be 100% plug n play for $350 shipped. The kit would include a used black pre-wired Buick Encore Heated Steering Wheel with an OEM cruise/heated steering wheel switch installed on the left side of the wheel. A new clock spring is also included along with a custom power harness that taps into the cigarette lighter fuse in the driver side fuse box. You will re-use your current airbag.
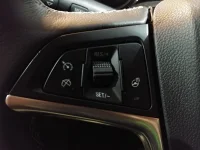
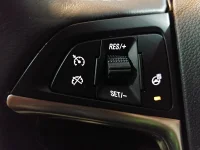
This kit is great for someone that cares more about functionality and doesn't mind a used steering wheel with some signs of use, minor scratches, etc. Also to note, the new OEM cruise/heated steering wheel switch will illuminate WHITE. If the rest of your button back lighting is blue like my wife's 2013, this may bother you. Lucky for us, it does not.
This kit should be installed by a professional. However, with some basic tools and DIY skill, this kit can be installed by yourself and/or with a friend's help in less than 3 hours.
Basic Tools Needed
------------------------------------------
Small skinny flathead screwdriver
Phillips Screwdriver
Breaker bar or impact wrench with 2.5" extension for steering wheel bolt
7mm, 10mm Deep Sockets with ratchet
T-50 Torx that fits on your breaker bar/impact wrench
Needle nose pliers or a small fuse extractor
Steps:
- Turn steering wheel to the left
- Disconnect negative battery terminal
- Remove airbag from the rear with small screw driver and unplug
- Remove steering wheel bolt
- Unplug wire harness from clock spring
- Remove steering wheel
- Remove single screw from lower steering wheel cover
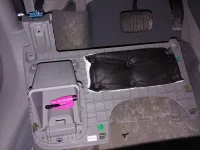
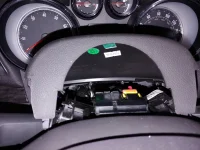
- Remove lower knee panel. There are 3 screws and lay cover on the floor because OBDII port will still be attached.
- Pull up from the upper steering wheel cover and the two covers will separate exposing two more screws holding the lower cover on. Remove these screws.
- Remove two upper clock spring wire harnesses. The airbag side is a two stage plug and the red clip needs to be removed first.
- Remove the four clock spring screws
- Remove the lower clock spring wire harness with a small flat head screw driver
- Swap the clock spring module from YOUR clock spring onto the NEW clock spring. There are 4 tabs that need to be depressed in order for the module to slip off.
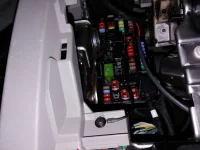
- Find the fuse box up under behind the "coin" tray and locate the 20 amp lighter fuse. Remove the 20 amp fuse and place it into the custom power harness. Plug in the custom power harness into the 20 amp lighter spot and route wire up along main wire harness going to the clock spring.
- Secure the ground wire to the 7mm screw holding down trim near the hood release
- Pull centered peg from new clock spring and turn to the left 180* and install the clock spring with the 4 screws
- Plug in two upper clock spring wire harnesses
- Plug in the lower clock spring wire harness
- Plug in custom power harness to clock spring harness
- Replace the lower steering wheel cover center screw and the two upper screws. Snap the covers back together.
- Install the new heated steering wheel upside down by feeding the airbag and heated steering wheel harnesses through the steering wheel.
- Plug in the clock spring and power harness to the heated steering wheel module. Secure the wire under the hook on the steering wheel.
- Replace the steering wheel bolt
- Replace the airbag plugs and airbag
- Replace negative battery terminal
- Enjoy your new to you heated steering wheel!
Attachments
-
 0224192302.webp165.7 KB · Views: 38
 -
 0224192302a.webp120.7 KB · Views: 39
 -
 0224192303.webp246.2 KB · Views: 37
 -
 0224192303a.webp208.7 KB · Views: 34
 -
 0224192303b.webp106.9 KB · Views: 33
 -
 0225191055.webp124.2 KB · Views: 32
 -
 0225191055a.webp278.5 KB · Views: 31
 -
 0225191056a.webp137.1 KB · Views: 30
 -
 0225191059.webp181.4 KB · Views: 34
Last edited:


