If anyone else is wanting to customize their 3D Kagu floor liners with a different emblem, I threw this "how-to" together. It's pretty simple and looks way better, despite the GS emblem not entirely covering the old 3D emblem. Since I have a GS, that's the emblem I went with, but there is nothing stopping you from using the TourX emblem, Buick Shield, or some other European variant. This could probably be its own thread but why not keep everything together? Here goes...
Difficulty
1 beer (on a six-pack scale)
Build Materials
Floor Liners... duh (I purchased the full black set, PN
L1BC03901509)
Emblem of choice x2 or x4 if you want to do the rear mats as well (I went with the GS emblem, PN
39156640)
Tools Required
Epoxy (I used
JB Weld Clear Weld Quick-Setting Epoxy but just about any decent epoxy would work)
Surface to mix epoxy on
Pry Tool or Pliers
Saw (needed to cut off tab on GS emblem)
180 grit sandpaper or close equivalent (to clean up what the saw leaves behind)
Weight to keep pressure on emblem while epoxy cures
A solid, flat surface to set mats on while epoxy cures
Paper towel, microfiber, or anything else to help clean up epoxy runs/spills
I should also recommend using some nitrile/latex gloves
The Meat and Potatoes
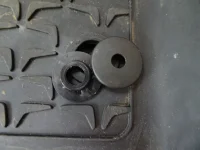
- Remove the 3D emblems by getting underneath the metal buttons and prying. If you want to, these buttons can be epoxied back on the mats for an original and clean look. If you don't intend to reuse them, simply tear them off with a pair of pliers. You can see that the buttons are just pushed onto the aluminum 3D emblem posts.View attachment 15924
- Time to prep the GS emblems. The tab shown on the left needs to be removed, this is where the saw comes into play. Once the tab has been sawed off, place the sandpaper on a solid flat surface and sand down what is left of the tab. A rough grit is desired here because it will create a better surface for the epoxy to adhere to. It doesn't hurt to clean the surface while you're at it.View attachment 15925
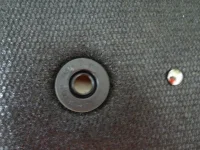
- It's now time to get everything ready for epoxy. With the 3D emblem already removed, you can see that there is an indentation of the emblem and two holes. Practice aligning the new emblem how you like it before applying epoxy. I filled in the two holes with epoxy before placing the emblems on just to make sure they would not leak. Ideally, the emblem you choose covers the entire recess. View attachment 15926
- I placed a cutting board covered with saran wrap underneath the mat to provide a solid base for attaching the GS emblems. Apply a thin layer of epoxy to the bottom, sanded surface, of the emblem. Leave some space on around the edges so that the epoxy does not squeeze out. Carefully place the new emblems in the desired location (the GS emblem fits perfectly within the recess). I placed a microfiber towel, an old shop manual, and then a glass jug filled with change on top of the GS emblem. View attachment 15927
- If you have already finished your beer or other drink of choice by this point, grab another one to enjoy while you wait for the epoxy to cure.
End Result
The tail of the 3D emblem still shows but you really don't notice it once the mats are installed. Nonetheless, I prefer to see that GS emblem which was sadly missing from the OEM mats.
View attachment 15928
Before and After
View attachment 15929
View attachment 15932