KingDapostrophe
Member
- Joined
- Feb 23, 2021
- Messages
- 49
- Reaction score
- 43
- Points
- 18
- Location
- Iowa
- Buick Ownership
- 2018 Regal TourX Essence
Just wanted to share my spare setup. Going on a long road trip tomorrow (through Colorado, I should be able to test out this AWD and get some great pics along the way).
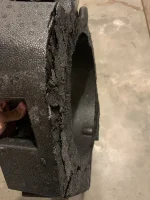
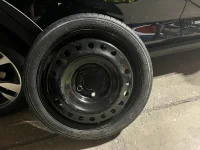
Picked up a spare from a 06 Cadillac DTS from a junkyard about 30 minutes away. When I test fit it, I immediately noticed that it doesn't sit evenly on the base of the well (duh), so I had to get creative. I cut the bottom part of the stock foam storage thing with a multi-tool and a bread knife around the same level of the flat part that the sub sits in.

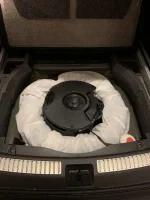
The bottom of this piece is contoured to level out the bottom of the spare tire well, so when cut, it's a nice flat surface for the spare to sit on. I then wrapped the spare in a fabric bag that came with my table saw. It's been sitting in my basement for a year, so it's about time I found a use for it. I picked up a jack from Lowe's, and already have a breaker bar and socket set in my tool kit (which is strapped in the hatch where the first aid and triangles are supposed to go. As you can see in the pic, the sealant fits pretty nicely in there. Not pictured is the portable pump, jumper cables, jack, and a few other small tools that I wrapped in old socks and tossed in there. I'm pretty happy with this setup, and if it turns out that I get unlucky and end up with the water in the spare tire well issue, the wheel and everything else is still well elevated by the foam.

The only hurdle I had to jump was getting the plastic piece to screw back in. The sub on top of the spare was just a little bit too high, but the flat part of the plastic piece pops right off and that provided enough relief to get everything screwed down. I'm pretty happy with out this turned out.
Picked up a spare from a 06 Cadillac DTS from a junkyard about 30 minutes away. When I test fit it, I immediately noticed that it doesn't sit evenly on the base of the well (duh), so I had to get creative. I cut the bottom part of the stock foam storage thing with a multi-tool and a bread knife around the same level of the flat part that the sub sits in.

The bottom of this piece is contoured to level out the bottom of the spare tire well, so when cut, it's a nice flat surface for the spare to sit on. I then wrapped the spare in a fabric bag that came with my table saw. It's been sitting in my basement for a year, so it's about time I found a use for it. I picked up a jack from Lowe's, and already have a breaker bar and socket set in my tool kit (which is strapped in the hatch where the first aid and triangles are supposed to go. As you can see in the pic, the sealant fits pretty nicely in there. Not pictured is the portable pump, jumper cables, jack, and a few other small tools that I wrapped in old socks and tossed in there. I'm pretty happy with this setup, and if it turns out that I get unlucky and end up with the water in the spare tire well issue, the wheel and everything else is still well elevated by the foam.

The only hurdle I had to jump was getting the plastic piece to screw back in. The sub on top of the spare was just a little bit too high, but the flat part of the plastic piece pops right off and that provided enough relief to get everything screwed down. I'm pretty happy with out this turned out.


