• This section is for help and assistance with 2018 and NEWER Buick Regals. If you need assistance with a 2011-2017 Buick Regal, CLICK HERE. If you need assistance with a 2010 or older Buick Regal, CLICK HERE. This notice may be dismissed by clicking the X in the right corner.
  • Car enthusiast? Join us on Cars Connected! iOS | Android | Desktop

The switch has arrived

No software update required for the mirrors!...from what I understand to activate the cameras I need to install the front one and software activation is required however it cannot be done locally!...I’m really thinking about shipping the car to Germany and having them do it!
Ok...besides the part number for the mirrors do you remember what kind of connection the camera had? Just wondering if something like a Lockpick would work to take those inputs and display on the HMI when you use your turn signal. Also in another thread someone mentioned White Automotive, they do some module programming and would likely be cheaper than shipping your car off. The other possible cheaper way would be to find a mechanic over there that wants a trip to the states. If you buy the ticket you might get someone here. But make sure you get copies of the code...then you can recover those funds when the rest of us follow your lead.
 
I'm interested in group buying all the parts if your plan works out! Wish you Good Luck!
 
Also...out of curiosity, do the new mirrors have anti dazzle on both sides and do they have the wider field of view for drivers mirror? Also, is the blind spot alert the same?
 
Also...out of curiosity, do the new mirrors have anti dazzle on both sides and do they have the wider field of view for drivers mirror? Also, is the blind spot alert the same?
The mirrors are identical to the OEM with the addition of a welcome led light, the camera, and that it folds!
 
______________________________

Help support this site so it can continue supporting you!
  • Like
Reactions: D2R
I wanted to take some time and spread some light on the information that has already been shared. I finally got around to ordering parts and just installed the switch.

As was already confirmed, the switch alone is bnot enough to turn off auto stop/start and the auto stop/start off button LED does not light up.

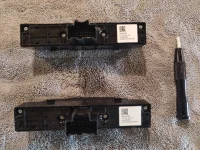
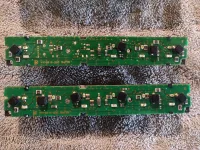
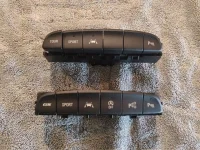
Nonetheless, I thought I'd share the process of swapping the "TOUR" button with the "GS" button on the new switch and show some side by sides. For all photos, the original Buick switch is on top and the Opel switch is on bottom. Before disassembly:
IMG_20200701_124549__01.jpg

1) Remove the four screws on the back. I used a #1 Phillips:IMG_20200701_124719.jpg

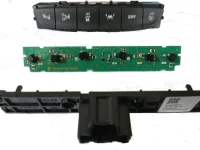
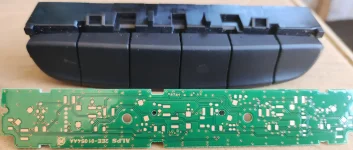
2) Pull the connector panel and circuit board out:
IMG_20200701_125655.jpg

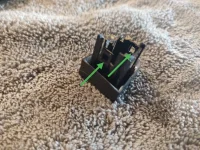
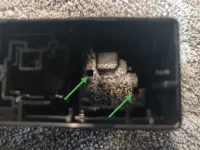
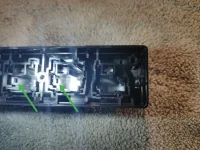
3) Remove the button. There are two small tabs with rectangular slots on the button itself. These tabs lock onto two square post in the main switch body. All that's required to remove the button is to carefully bend these tabs out until they are no longer captured by the post.IMG_20200701_125353__01.jpgIMG_20200701_125323__01.jpgIMG_20200701_125522__01.jpg

4) Now just swap the buttons, they snap right into place. All finished, no longer any blank buttons in this fully loaded GS:IMG_20200701_125853.jpg

Everything that already existed on the car (GS, SPORT, LKA, and Park Assist) all function properly. Just no dice on the rest. Video for reference:
 
They don't illuminate even when the headlights are turned on?
 
I wanted to take some time and spread some light on the information that has already been shared. I finally got around to ordering parts and just installed the switch.

As was already confirmed, the switch alone is bnot enough to turn off auto stop/start and the auto stop/start off button LED does not light up.

Nonetheless, I thought I'd share the process of swapping the "TOUR" button with the "GS" button on the new switch and show some side by sides. For all photos, the original Buick switch is on top and the Opel switch is on bottom. Before disassembly:
View attachment 23805

1) Remove the four screws on the back. I used a #1 Phillips:View attachment 23806

2) Pull the connector panel and circuit board out:
View attachment 23807

3) Remove the button. There are two small tabs with rectangular slots on the button itself. These tabs lock onto two square post in the main switch body. All that's required to remove the button is to carefully bend these tabs out until they are no longer captured by the post.View attachment 23808View attachment 23809View attachment 23810

4) Now just swap the buttons, they snap right into place. All finished, no longer any blank buttons in this fully loaded GS:View attachment 23811

Everything that already existed on the car (GS, SPORT, LKA, and Park Assist) all function properly. Just no dice on the rest. Video for reference:
Input from the button has to be assigned in order to get it to work. Now, just an idea for you. Ask guys from trifecta - if they can assign tune enable to GS button and have ASS button functional.
 
I wanted to take some time and spread some light on the information that has already been shared. I finally got around to ordering parts and just installed the switch.

As was already confirmed, the switch alone is bnot enough to turn off auto stop/start and the auto stop/start off button LED does not light up.

Nonetheless, I thought I'd share the process of swapping the "TOUR" button with the "GS" button on the new switch and show some side by sides. For all photos, the original Buick switch is on top and the Opel switch is on bottom. Before disassembly:
View attachment 23805

1) Remove the four screws on the back. I used a #1 Phillips:View attachment 23806

2) Pull the connector panel and circuit board out:
View attachment 23807

3) Remove the button. There are two small tabs with rectangular slots on the button itself. These tabs lock onto two square post in the main switch body. All that's required to remove the button is to carefully bend these tabs out until they are no longer captured by the post.View attachment 23808View attachment 23809View attachment 23810

4) Now just swap the buttons, they snap right into place. All finished, no longer any blank buttons in this fully loaded GS:View attachment 23811

Everything that already existed on the car (GS, SPORT, LKA, and Park Assist) all function properly. Just no dice on the rest. Video for reference:
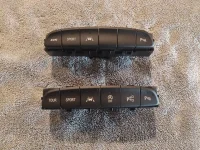
The wiring g harness in the center console needs replaced as well. Based on the wiring diagrams, the body wiring harness has 2 wires that are for the start/stop. One is a command line and the other to illuminate the button.
 
______________________________

Help support this site so it can continue supporting you!
When I ordered the mirrors I told them I need the wiring that goes along with them. So I got 2 mirrors 2 harness and door panel switch that has the mirror fold option. The mirrors work without the switch automatically when you lock/unlock the car!...I just wanted to have it complete!

Were these mirrors an ebay item? What part number should we be looking for? I know you've already installed these, but a short write up would help as far as the wiring goes.
 
When I ordered the mirrors I told them I need the wiring that goes along with them. So I got 2 mirrors 2 harness and door panel switch that has the mirror fold option. The mirrors work without the switch automatically when you lock/unlock the car!...I just wanted to have it complete!
Revisiting this 1 year later. Do you have a part number for the mirror harness? I'm starting to move forward on this and would like to grab the harness as well. Also, who did you order from?
 
Here goes my step by step instructions for removing the center shift console, bear with me. Since there is a limit on how many attachments I can add, I have bundled some of the images together.

Difficulty
1 or 2 beers

Tools needed
Hands
Thin shims/screwdrivers/credit cards (whatever works best for Step 9)

Hints to pay attention to before you tear into disassembly
Take your time
Plastic is plastic, and plastic breaks
Be mindful of the metal clips that can quickly scratch up the interior plastic pieces

  1. Slide the front cup holder cover open fully so it's out of the way. Once this is done, with both hands grab the edge of the plastic and gently but firmly lift up.
  2. Two of the seven clips have now been released. Three more are in the middle, and the last two are behind the single cup holder (skip to Step 10 to see where these clips are located). Now, work your fingertips along the edges to pop the other clips. Be very careful not to apply too much pressure on the narrow portions around the cup holder. Just keep working your way around until they are all free. View attachment 15778
  3. Here are the metal clips that you need to watch out for. They will scratch the interior plastic. I recommend placing some microfiber towels or equivalent between these clips and the plastic. View attachment 15779
  4. With all clips released, it's now time to tackle the wire connectors. Remove the parking brake switch wire first. You'll have to feel around a little bit, but the button to release the clip is on the passenger side.
  5. Next, remove the drive mode switch connector. The button to release the clip is toward the front of the vehicle. Leave the small connector in the middle attached (circled in red).View attachment 15781
  6. Now detach the center chrome trim piece. There are six small clips around the outside (circled). It helps to apply pressure upward to prevent the clips from snapping back in place while you tackle the others.
  7. Once all of the clips are free, the center trim piece slides towards the front of the vehicle.View attachment 15782
  8. With the center piece free, the black or brown wood pattern trim piece can be lifted straight up. Rotate the chrome piece so that it fits between the black/brown wood pattern trim as shown here. View attachment 15784
  9. Now, time to remove the switch. There are tabs on either side of the switch that hold it in place. They are very stubborn but it can be done. Here is where it is helpful to use some credit cards to hold each individual tab open. With all of the tabs pulled away from the switch, it can be pushed through the bottom (connector side). View attachment 15786
  10. Full view of trim piece for reference of metal clip locations.View attachment 15788
  11. All that is left to do now is to swap the switch assembly and reinstall everything just as it came apart. Just give all of the clip locations a firm press and they will seat nicely. There are really no other tricks or hints I can give here as it goes together much simpler than it comes apart... so if you made it this far, you should be fine. Just remember to have all of the wires connected.
Please feel free to ask additional questions if I didn't explain something thoroughly enough!
Not to get off topic, but I’m wanting to buy an assortment of clips, fasteners, and plastic rivets to have on hand during my sound proofing project next weekend. I’ll be pulling just about every panel and trim piece in the car and I’m almost sure to break a few.

Any ideas on where to find a kit or kits with those items?
I just got one on Amazon, it came with the tools to pop them too. Think it was less than $15 delivered. Of course since I got it I haven't needed it. But still glad I picked it up.
 
______________________________

Help support this site so it can continue supporting you!
I just got one on Amazon, it came with the tools to pop them too. Think it was less than $15 delivered. Of course since I got it I haven't needed it. But still glad I picked it up.
Could you send a link? I would prefer to have at least 2 spares on hand for each type of clip, fastener, etc. Trouble is, I have no pics or specs for the items I need.
 
The one I got is no longer available but there are tons available. This one is a bit bigger, not much more and has lots of good reviews. Amazon.com: KCRTEK 630pcs Car Push Retainer Clips Plastic Rivets Kit with 16 Most Popular Automotive Parts Sizes,Auto Screw Clips for Toyota GM Ford Honda Acura Chrysler: Automotive
And you’re sure this kit contains every type of clip I will encounter during my project?

I guess worst case scenario I might have to make a trip to the local dealership if I don’t have something needed to reassemble a panel or something.
 
And you’re sure this kit contains every type of clip I will encounter during my project?

I guess worst case scenario I might have to make a trip to the local dealership if I don’t have something needed to reassemble a panel or something.
Keep in mind, most of the tabs/clips are molded into the parts themselves. No kit you buy is gonna help you on a majority of the interior panels.
 
______________________________

Help support this site so it can continue supporting you!
Keep in mind, most of the tabs/clips are molded into the parts themselves. No kit you buy is gonna help you on a majority of the interior panels.
See... that’s why I love this forum! As long as the molded clips don’t lose any holding strength I’m fine with that. The chances of me breaking a clip are low. I usually obtain factory schematics, so I can apply pressure directly behind the clip’s attachment point. I also keep a high strength epoxy on hand to repair boo-boos.
 
part #42568937 - from '20 Encore GX Essence AWD

42568937.jpg

& a bit more discussion on this here.
 
Last edited:
OEM setup on our Preferred has no buttons at all on the circuit board.
39026409_b.webp
Harness (89047360) has 11 wires in it - i've no idea why, or if any of them are connected to anything at the other end
89047360.webp

Haven't gotten any further on this.

I don't have the pin-out for the #42568937 board, nor a '20 Encore GX Essence AWD service manual
 
OEM setup on our Preferred has no buttons at all on the circuit board.
View attachment 46477
Harness (89047360) has 11 wires in it - i've no idea why, or if any of them are connected to anything at the other end
View attachment 46478

Haven't gotten any further on this.

I don't have the pin-out for the #42568937 board, nor a '20 Encore GX Essence AWD service manual
You'd have to enable things via programming (and potentially need extra wiring) for additional functionality. If you don't have any buttons on the old switch-all you'd get is a backlight at night.
 
Back
Top