Lt0302
Active member
- Joined
- Feb 22, 2019
- Messages
- 163
- Reaction score
- 120
- Points
- 43
- Buick Ownership
- Regal Sportsback GS
The car lovers social network
High Performance for your Buick
Create videos that captivate
Automotive Hot or Not
Vehicle hacker protection
Buick parts & accessories
Advertise with us!
The car lovers social network
High Performance for your Buick
Create videos that captivate
Automotive Hot or Not
Vehicle hacker protection
Buick parts & accessories
Advertise with us!

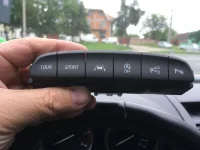
No clue on how to remove the shifter console but isn't this just a cosmetic change only?
Interesting, how much was the part?I’m hoping it is not!...based on my research we can add the parallel parking feature ...not sure about SS off
Interesting, how much was the part?
That's not bad at all, keep us updated on how it goes.Part was roughly 70 bucks with shipping being 50 from Germany to AZ!
I May take it to the dealer and have them install it since they have to program the parallel parking part
Part was roughly 70 bucks with shipping being 50 from Germany to AZ!
I May take it to the dealer and have them install it since they have to program the parallel parking part
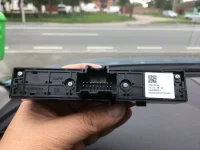
I was wondering that too because I had assumed you would need to have the sensors for it as well....How do you enable parallel park assist?
Loading the software that they have in the top of the line model!How do you enable parallel park assist?


agreed - I don’t think this is as simple as uploading new software. It’s going to need the corresponding hardware...and yes, I do wish ours had it...For parallel parking there are radar sensors at all four corners so it can see to the sides. We do not have those sensors.