Update:
Thanks to HTH's (and others) directions, and this youtube video, I got it. It was really hot this afternoon, and I was too lazy for photos, so I'll do my best to do a dummy's guide:
Youtube video:
1. Find/buy a replacement visor first. Based on the conversations in this thread, many Buick visors from the Envision and the 2013-2017 Regal will work. So if you want a new one, you can get it for ~$50, or do what I did and get it from ebay for ~$25 shipped.
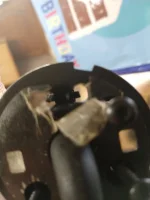
2. There are 2 difficult parts - Removing the visor from the white retention plate and getting to the electrical plug.
3. First, watch the video linked above and study the replacement visor to get an idea as to the 3 plastic clips holding the visor plate to the white retention plate.
4. Pop off the beige/grey cover plate with your fingers. (easy)
5. Remove the 3 T-15 torx screws (easy)
6. HTH and the video removed the "big clip" with long needle nose pliers. I was able to better remove all 3 clips using a long thin flat head screw driver. I also practiced on the replacement part, so I was able to do it in a few seconds and not break any clips. However, don't worry if you do break the clips. They are there for ease of assembly at the car factory. Additional note: I was confused about the clips because there was a really nice piece of black tape covering the visor plate, which only had the 3 screw holes. Once I removed the tape, I can see that the clips were the same as the replacement and as HTH described.
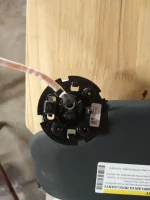
7. Once the visor is separated from the white retention plate, it is essentially "off". At this point, I had a decision - take the easy path and cut the wire (carefully not to short it) and patch it. This was feasible since I've never used the vanity mirror in my life... OR, I start peeling back the liner. I took the second path....
8. The connector is loosely between the liner and the roof, maybe near the top of your driver's head. You get to it by ripping the liner off at the rubber seal by the door. I don't know how to better describe it. This is difficult because while the liner is relatively easy to manipulate, but there is constant fear of tearing and creasing it. I pulled it down enough to get at the plug. The plug has a lock-clip which requires strong finger nail or a long flat head screw driver to pop off. I tried to do it one-handed for about 30 seconds before giving up, and pulling more liner down and using the same small screw driver previously used for the clips. Your replacement visor plug will serve a good visual example of where the clip is.
9. At this point, your original visor will fall down in your lap. Hopefully, you can figure out how to snap the white retention plate onto the visor sandwiching the liner in between and not pinching the wire.
10. Reconnect the electrical plug. Listen for the snap. This would be a good time to turn the car on to check the lights work.
11. Align your visor with the 3 holes and reinstall the 3 T-15 screws.
12. Tuck the liner back in. I was really relieved that it wasn't as difficult as I imagined. Everything looked ok.
Total time for the install (not counting googling for video or practicing clip release on the replacement) was under 30 minutes.
Additional thoughts:
1. Buick uses some traditional light bulbs for the vanity light, which is yellowish and dim. I remember reading someone complaining and replacing with something easy. I probably will never use it, but would be nice to know if there are some easy drop in replacement LEDs of at least something brighter...
2. In hindsight, I'm not sure this replacement was worth the risk... Sure, the extension makes the visor work better, but it isn't perfect anyway, and not practically better than the cheap (and ugly) visor CD holder I used for almost 2 years prior to this, or some of the clip-on options (more visually elegant) for $20 from Amazon/Ebay.