• This section is for help and assistance with 2018 and NEWER Buick Regals. If you need assistance with a 2011-2017 Buick Regal, CLICK HERE. If you need assistance with a 2010 or older Buick Regal, CLICK HERE. This notice may be dismissed by clicking the X in the right corner.
  • Car enthusiast? Join us on Cars Connected! iOS | Android | Desktop

EXTENDABLE DRIVER SIDE SUN VISOR?

Thanks to a forum member for the following info: 2011-17 Buick Regal extendable sunshades in 3 trim colors available from Amazon. I ordered both sides $50 each, had my local auto upholstery install for $125, they made the visor light adjustments, installation came out great. Part #'s for titanium 22800051 RH, 22800048 LH.
When you say upholstery install, do you mean some place like a body shop?
 
Sorry, I meant Auto Upholstery Shop.
 
  • Like
Reactions: D2R
Finally got my new sun visors from GM Parts Direct. For a Shale colored interior I got the part numbers from a 2019 Envision. Went in pretty easily and look good. The new ones have a fabric cover instead of molded plastic - also a little nicer. I took the led bulbs from the old ones - the new ones have regular bulbs. NO MORE SUN BLIND GOING TO WORK!!🙂😎


84173704Sunshade$129.87
84173524Sun-Visor$97.32
 
______________________________

Help support this site so it can continue supporting you!
Finally got my new sun visors from GM Parts Direct. For a Shale colored interior I got the part numbers from a 2019 Envision. Went in pretty easily and look good. The new ones have a fabric cover instead of molded plastic - also a little nicer. I took the led bulbs from the old ones - the new ones have regular bulbs. NO MORE SUN BLIND GOING TO WORK!!🙂😎


84173704Sunshade$129.87
84173524Sun-Visor$97.32
Would be great if there are some pictures that can be shared with the rest of us. 🙂
I also have the shale interior and still on the fence whether to bite the bullet or not.🤔
(Also found the previous gen Regal sun visors on eBay for 50 bucks a pop.)
 
These are off of previous gen Regal (black/grey interior). They are identical to the ones I pulled off except that they are extendable. I also changed over the LED lights from the pull-offs.

How much work was the install? They're pretty cheap off ebay... Is it just some screws, or are there wire spicing/fabric cutting or special tools involved?
 
How much work was the install? They're pretty cheap off ebay... Is it just some screws, or are there wire spicing/fabric cutting or special tools involved?
I had my audio/tint shop do it... but there is no splicing. The wires are the same. The problem is to get to the wires, you have to pull the a-pillar trim back... which is why I didn't do it.
 
______________________________

Help support this site so it can continue supporting you!
I had my audio/tint shop do it... but there is no splicing. The wires are the same. The problem is to get to the wires, you have to pull the a-pillar trim back... which is why I didn't do it.

Hmm, I still aren't picturing it. Sorry...

Lets say I want to use either the Envision visor or the old Regal visor, but is willing to forego the vanity mirror light, but don't want to cut any wires in my car, would I be able to do it easily but not have exposed wiring?
 
Hmm, I still aren't picturing it. Sorry...

Lets say I want to use either the Envision visor or the old Regal visor, but is willing to forego the vanity mirror light, but don't want to cut any wires in my car, would I be able to do it easily but not have exposed wiring?
I didn't look at it, but I assume that you'd have to cut the wires on the old one to get it off. Not sure if there's space to stuff the connector up there. I'd pull the cover off of the old one and see what you're working with before you pull the trigger... although I will tell you that paying someone to do it was worth every penny.
 
You really don't want to cut those wires--one of them is ground & the other is a live +12V--there would be sparks.

Popping off the front pillar is easy enough, and so is folding back the door gasket to allow pulling down the headliner. A small screwdriver helps to separate the connector for the lamps in the visor. If you want to do it yourself, it's about 30 minutes per side; if you have a shop do it, the only tool you'll need is a credit card.
The shop I had do it prefers cash money.
 
______________________________

Help support this site so it can continue supporting you!
When I changed mine out I didn't have to pop the pillar covers off. Just pulled the wires a little and the connector came right out. Just pushed it back in out of the way for the install. Its just 3 screws and a plastic spacer holding the visor in - pretty easy but you will need a torx head screw driver.
 
I'm stuck... In my attempt, I popped the plastic cover off, and easily removed the 3 T15 screws. However, I'm not getting the visor off. I'm afraid of breaking something... Should I pull straight down? Pry on something? Rotate it?
 
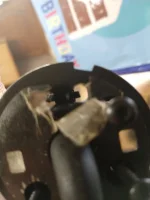
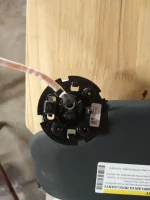
Looking at the pictures I attached, you will see 2 small plastic tabs on either side. These you can pop out with your fingers. The other picture shows a slot with the tricky bastards that don't like to release. If you have snap ring pliers or narrow needle nose pliers, you can remove the tape covering the hole and reach up and squeeze the tabs together. At the same time you will need to pull down. If that doesn't work, as one of mine broke, you can pull down and it should pop free. Keep in mind that all that's holding it is a small plastic ring.
 

Attachments

  • IMG_20200622_124009529.webp
    IMG_20200622_124009529.webp
    71.6 KB · Views: 30
  • IMG_20200622_124002056.webp
    IMG_20200622_124002056.webp
    112.5 KB · Views: 30
______________________________

Help support this site so it can continue supporting you!
  • Like
Reactions: D2R
Looking at the pictures I attached, you will see 2 small plastic tabs on either side. These you can pop out with your fingers. The other picture shows a slot with the tricky bastards that don't like to release. If you have snap ring pliers or narrow needle nose pliers, you can remove the tape covering the hole and reach up and squeeze the tabs together. At the same time you will need to pull down. If that doesn't work, as one of mine broke, you can pull down and it should pop free. Keep in mind that all that's holding it is a small plastic ring.

I'm not sure I'm following, but there are 2 or 4 tabs that I will need to pop/release... (In your 2 photos, there seems to be many tabs - Looking at the second photo (in focus), I see a big tab at the 12 and 6 O'clock position, and maybe another dual tab at the 9 O'clock position, which seem to be the same as in the unfocused photo #1??)

Also, I figure the photos show the hidden side, but they look completely different than the replacement visor I brought... maybe the one I brought has an additional shell/cover on it as as well?

but in the end, if I pull hard enough (straight down), I can get it off without damaging my car? I am not near my car right now, but I'll try to work on it and report back.

Thanks!
 
Last edited:
Update:
Thanks to HTH's (and others) directions, and this youtube video, I got it. It was really hot this afternoon, and I was too lazy for photos, so I'll do my best to do a dummy's guide:

Youtube video:

1. Find/buy a replacement visor first. Based on the conversations in this thread, many Buick visors from the Envision and the 2013-2017 Regal will work. So if you want a new one, you can get it for ~$50, or do what I did and get it from ebay for ~$25 shipped.
2. There are 2 difficult parts - Removing the visor from the white retention plate and getting to the electrical plug.
3. First, watch the video linked above and study the replacement visor to get an idea as to the 3 plastic clips holding the visor plate to the white retention plate.
4. Pop off the beige/grey cover plate with your fingers. (easy)
5. Remove the 3 T-15 torx screws (easy)
6. HTH and the video removed the "big clip" with long needle nose pliers. I was able to better remove all 3 clips using a long thin flat head screw driver. I also practiced on the replacement part, so I was able to do it in a few seconds and not break any clips. However, don't worry if you do break the clips. They are there for ease of assembly at the car factory. Additional note: I was confused about the clips because there was a really nice piece of black tape covering the visor plate, which only had the 3 screw holes. Once I removed the tape, I can see that the clips were the same as the replacement and as HTH described.
7. Once the visor is separated from the white retention plate, it is essentially "off". At this point, I had a decision - take the easy path and cut the wire (carefully not to short it) and patch it. This was feasible since I've never used the vanity mirror in my life... OR, I start peeling back the liner. I took the second path....
8. The connector is loosely between the liner and the roof, maybe near the top of your driver's head. You get to it by ripping the liner off at the rubber seal by the door. I don't know how to better describe it. This is difficult because while the liner is relatively easy to manipulate, but there is constant fear of tearing and creasing it. I pulled it down enough to get at the plug. The plug has a lock-clip which requires strong finger nail or a long flat head screw driver to pop off. I tried to do it one-handed for about 30 seconds before giving up, and pulling more liner down and using the same small screw driver previously used for the clips. Your replacement visor plug will serve a good visual example of where the clip is.
9. At this point, your original visor will fall down in your lap. Hopefully, you can figure out how to snap the white retention plate onto the visor sandwiching the liner in between and not pinching the wire.
10. Reconnect the electrical plug. Listen for the snap. This would be a good time to turn the car on to check the lights work.
11. Align your visor with the 3 holes and reinstall the 3 T-15 screws.
12. Tuck the liner back in. I was really relieved that it wasn't as difficult as I imagined. Everything looked ok.

Total time for the install (not counting googling for video or practicing clip release on the replacement) was under 30 minutes.

Additional thoughts:
1. Buick uses some traditional light bulbs for the vanity light, which is yellowish and dim. I remember reading someone complaining and replacing with something easy. I probably will never use it, but would be nice to know if there are some easy drop in replacement LEDs of at least something brighter...
2. In hindsight, I'm not sure this replacement was worth the risk... Sure, the extension makes the visor work better, but it isn't perfect anyway, and not practically better than the cheap (and ugly) visor CD holder I used for almost 2 years prior to this, or some of the clip-on options (more visually elegant) for $20 from Amazon/Ebay.
 
Last edited:
Additional thoughts:
1. Buick uses some traditional light bulbs for the vanity light, which is yellowish and dim. I remember reading someone complaining and replacing with something easy. I probably will never use it, but would be nice to know if there are some easy drop in replacement LEDs of at least something brighter...
2. In hindsight, I'm not sure this replacement was worth the risk... Sure, the extension makes the visor work better, but it isn't perfect anyway, and not practically better than the cheap (and ugly) visor CD holder I used for almost 2 years prior to this, or some of the clip-on options (more visually elegant) for $20 from Amazon/Ebay.
1. The LEDs out of your old visor should work. They are directional, so you have to put them in the same way (i.e. they won't work if they're upside down)
2. I disagree... I would do this every time.
 
  • Like
Reactions: D2R
1. The LEDs out of your old visor should work. They are directional, so you have to put them in the same way (i.e. they won't work if they're upside down)
2. I disagree... I would do this every time.

1. Thanks! I'll swap out the bulbs shortly.
2. Thats the key - you do this "every time". I think I did creased/cracked the edge of my liner, but since it was tucked behind/into the A-pillar liner, it was not visible. Unfortunately, I am one of those people that will dwell on that one little stain, or scratch, rattle, etc, especially since I spend a lot of time in my car (at least I used to before the COVID19 lockdown). So I'd rather not cause any cosmetic damage to my interior if I don't have to.
On a related note, right after I successfully swapped my visor, I tried to swap my rear wiper blade and promptly broken my wiper arm... This time, only a $20 mistake.
 
Back
Top