• This section is for help and assistance with 2018 and NEWER Buick Regals. If you need assistance with a 2011-2017 Buick Regal, CLICK HERE. If you need assistance with a 2010 or older Buick Regal, CLICK HERE. This notice may be dismissed by clicking the X in the right corner.
  • Car enthusiast? Join us on Cars Connected! iOS | Android | Desktop

I Removed the Plastic Cladding Trim on the Tourx

It's an Opel, and they DO have a "delete" option: The regular Insignia wagon.

GM has simply failed to import the regular wagon...

FWIW, Subaru doesn't offer a delete-the-fugly-cladding-and-roofrails option on the Outback, either.
Difference with Subaru is that there is no longer an uncladded Outback counterpart. It used to be the Legacy wagon, but they discontinued the Legacy wagon. The Outback is now a standalone model, unlike the Opel Sports Tourer and Country Tourer. Closest they have is the Levorg, but that's apparently built on the Impreza platform and is several inches shorter (in length) than the Outback. Looks great, though. A little smaller than I would want. If Subaru still had a proper Legacy wagon...
 
I was thinking of getting the same done, don't want to go through the expense of buying GS bumpers and body kits. Figured, just paint the plastic cladding in body color, get a set of the sport springs and 19" wheels.
 
I was thinking of getting the same done, don't want to go through the expense of buying GS bumpers and body kits. Figured, just paint the plastic cladding in body color, get a set of the sport springs and 19" wheels.
I wonder if someone can photoshop that. I'd really be interested in seeing what it would look like with body-matched painted cladding.
 
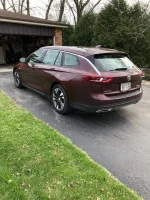
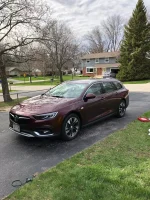
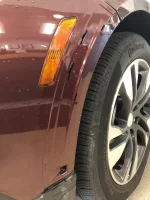
Removed all cladding today and got the driver side cleaned up of adhesive residue. The double stick tape is uber strong, and didn’t come off without a fight. The paint is already etched and small scratches are on the outline of the cladding, but a bit of paint correction should clean it up. I went ahead and removed the front bumper trim...working a few body shop contacts for a solution. Next weekend I will clean up passenger side...

D8F51171-CE89-40DF-9219-4EF252AA334E.webp4357E4B9-95D9-4C48-8AAF-FADAD428879C.webp
 
______________________________

Help support this site so it can continue supporting you!
Looks great on that color! Looks like a much more expensive car.
 
Looks great on that color! Looks like a much more expensive car.
Thanks! It’s not as boss as the GS build you got goin’ on - but I think it does look a bit more refined. A Regal sportback front bumper should fit (as rioja red is N/A in GS) which would make it more complete. And thanks to you and the flooded GS donor, I now find myself periodically looking at IAA in case I luck out on a match. However I will likely just have it patched and painted. Hope to have that solution nailed down in the next couple weeks...
 
Word of warning regarding the cladding...In some cases when the cladding was applied at factory, it did not seat correctly around the wheel well so body filler was used to fill any voids. When the cladding is removed, you may find some body filler and a spot where the original paint color has been sanded off so that the body filler will adhere. The cladding was applied at the factory with the body filler taking up the void. When you remove the cladding, there is a possibility you are going to see that body filler holding on the cladding. You are now going to encounter some necessary bogy work around the wheel wells or you may be wise to reattach the cladding unless you damaged it while removing. Ask me how I know.
 
Word of warning regarding the cladding...In some cases when the cladding was applied at factory, it did not seat correctly around the wheel well so body filler was used to fill any voids. When the cladding is removed, you may find some body filler and a spot where the original paint color has been sanded off so that the body filler will adhere. The cladding was applied at the factory with the body filler taking up the void. When you remove the cladding, there is a possibility you are going to see that body filler holding on the cladding. You are now going to encounter some necessary bogy work around the wheel wells or you may be wise to reattach the cladding unless you damaged it while removing. Ask me how I know.
Fortunately this is not the case for me, but I’ll bite. How do you know?
 
Pics? I can't imagine it came from the factory that way. Maybe a shady dealers attempt at a repair?
 
Pics? I can't imagine it came from the factory that way. Maybe a shady dealers attempt at a repair?

No...there's no question it came from Buick like that. It's actually something good they did to prevent a gap between the body and the cladding ebe though the double sided tape they use could put together the space shuttle
 
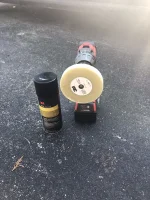
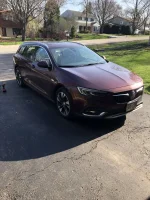
Passenger side cleaned up. I did not have the luxury of the 3M stripe off wheel last weekend...I would not recommend this job without it (don’t use it on the plastic parts). That tape is ballistic strength. 3M adhesive remover has always been in my detail kit...but there are plenty of good alternatives.

1916B2E4-72ED-4E76-9B10-7CC8EF23DA77.webp552A453C-248B-425A-9B94-7DDE9ED19FD1.webp
 
Passenger side cleaned up. I did not have the luxury of the 3M stripe off wheel last weekend...I would not recommend this job without it (don’t use it on the plastic parts). That tape is ballistic strength. 3M adhesive remover has always been in my detail kit...but there are plenty of good alternatives.

View attachment 15508View attachment 15509
Looks great
 
______________________________

Help support this site so it can continue supporting you!
I had thought about 3D printing some sort of plug to snap into the holes in the front bumper and then sanding and painting them to match. Not sure how feasible this is since I haven't yet removed my trim parts but it should be pretty cheap once the part is designed. I have used 3DHubs.com but there are lots of online printing services, and they are fast and cheap.
 
I had thought about 3D printing some sort of plug to snap into the holes in the front bumper and then sanding and painting them to match. Not sure how feasible this is since I haven't yet removed my trim parts but it should be pretty cheap once the part is designed. I have used 3DHubs.com but there are lots of online printing services, and they are fast and cheap.
it’s a good thought - candidly i have been too distracted lately to figure it out. Here’s a closeup of the front arch - note the indentation area in the front of the wheel arch as well as the small bumps right where the edge meets the wheel well. Painting the arch trim may be the easiest solution (as others have suggested) as they can be cleanly removed from the car (however you will likely break the small tabs that fit into the slots of the front bumper), but I really like the cleaner look...
002A4634-2A82-43F6-BCFF-103BC792D6A6.webp
 
I'm still looking for my future TourX at the right price. That said the cladding is going to be the first to go. Disappointing to see how the body is stamped & the cutouts in the front fender. Has anyone considered a body color vinyl wrap applied to that piece of cladding while stripping the rest? This would be a simple & reversible solution.
 
Back
Top